#handling asynchrony
Explore tagged Tumblr posts
Visit Tumblr Blog
Explore Tumblr blogs with no restrictions, modern design and the best experience.
Last Seen Tumblr Blogs


Fun Fact
Hackers stole 65M passwords from Tumblr in 2013.
Text
Purecode reviews | The strong typing in TypeScript
Learning RxJS Observables is vital for handling asynchrony in Angular, representing a significant aspect of its framework. The strong typing in TypeScript, although initially a hurdle, proves beneficial in preventing errors and maintaining large-scale Angular applications.
#strong typing#purecode ai company reviews#purecode ai reviews#purecode software reviews#purecode company#purecode#purecode reviews#typescript#large-scale Angular#handling asynchrony
0 notes
Text
How to log the call stack?
Console.WriteLine(new System.Diagnostics.StackTrace());
How to Implement try-catch within the function?
Let's implement a try-catch block within an asynchronous function. This is the solution to catch exceptions in asynchronous methods. Have a look at the following code. If you look closely inside the ShowAsync() function, then you will find we have implemented a try-catch within Task.run(). Within Task.run(), all processes are executed synchronously (in our example). So, if there is an exception, then it will be caught by the Exception Handling block.
using System; using System.Collections.Generic;
using System.Linq;
using System.Text;
using System.Threading;
using System.Threading.Tasks;
namespace Asynchronious
{
class Test {
public Task ShowAsync() { return Task.Run(() => { try { Task.Delay(2000); throw new Exception("My Own Exception"); } catch (Exception ex) { Console.WriteLine(ex.Message); return null; } }); } public async void Call() { try { await ShowAsync(); } catch (Exception ex) { Console.WriteLine(ex.Message); } } } class Program { public static void Main(String [] args) { Test t = new Test(); t.Call(); Console.ReadLine(); } } }
0 notes
Text
Selenium Waits in Python: Strategies for Synchronizing Test Execution
Selenium Waits in Python: Strategies for Synchronizing Test Execution
In the fast-paced world of automation testing, precision is key. Selenium in Python opens up a realm of possibilities, but efficient synchronization of test execution is paramount. Join us on a journey through the intricacies of Selenium Waits in Python—unveiling strategies that ensure your tests run seamlessly.
Table of Contents
Sr#
Headings
1
Introduction
2
The Dance of Synchronization
3
Understanding Selenium Waits
4
Implicit Waits: The Patient Wait
5
Explicit Waits: Precision in Timing
6
Fluent Waits: A Blend of Patience and Precision
7
Common Pitfalls in Synchronization
8
Strategies for Dynamic Elements
9
Selenium Waits and Page Load Times
10
Handling Asynchronous Calls
11
Best Practices for Effective Waits
12
Integrating Waits into Your Selenium Tests
13
Python with Selenium Course: Synchronization Mastery
14
Conclusion
Introduction
Welcome to the world of python with selenium course —a dance of precision and patience. In this article, we unravel the strategies that ensure your Automation Testing with Python journey is not just efficient but a symphony of perfectly synchronized test executions.
The Dance of Synchronization
Why is synchronization essential in automation testing? Imagine a dance where each move is perfectly synchronized. In automation testing, synchronization ensures that your tests execute flawlessly, keeping pace with the dynamic nature of web elements.
Understanding Selenium Waits
Breaking Down the Wait Game. selenium python course Waits are your secret weapon for synchronization. But how do they work? We take a closer look at the trio of Implicit Waits, Explicit Waits, and Fluent Waits, uncovering their unique roles in the Selenium ecosystem.
Implicit Waits: The Patient Wait
Let Time Unveil Perfection. Implicit Waits add a touch of patience to your python selenium testing. We explore how allowing a designated time for elements to appear enhances the reliability and stability of your test scripts.
Explicit Waits: Precision in Timing
Timing is Everything. Explicit Waits bring precision to the synchronization game. Learn how to specify the exact conditions and durations to pause your script, ensuring it moves forward only when the conditions are met.
Fluent Waits: A Blend of Patience and Precision
The Art of Balancing. Fluent Waits offer the best of both worlds. We delve into how they combine the patience of Implicit Waits with the precision of Explicit Waits, creating a harmonious synchronization strategy.
Common Pitfalls in Synchronization
Avoiding the Missteps. Synchronization comes with challenges. Explore common pitfalls like incorrect wait times and improper usage of waits, and discover how to navigate through them effectively.
Strategies for Dynamic Elements
Dynamic Elements, Unpredictable Outcomes. Dynamic elements can throw off your synchronization game. We share strategies to handle dynamically changing elements, ensuring your tests remain robust and reliable.
Selenium Waits and Page Load Times
Navigating the Loading Maze. Page load times can disrupt synchronization. Learn how Selenium Waits can be tuned to handle various page loading scenarios, ensuring your tests adapt to different speeds.
Handling Asynchronous Calls
Syncing with Asynchrony. Asynchronous calls can be tricky. We guide you through techniques to handle asynchronous behavior, ensuring your tests stay in perfect rhythm with the web application.
Best Practices for Effective Waits
Mastering the Art. Uncover best practices for implementing Selenium Waits effectively. From setting realistic wait times to using ExpectedConditions wisely, these practices ensure your synchronization game is top-notch.
Integrating Waits into Your Selenium Tests
Putting Theory into Practice. Learn how to seamlessly integrate Selenium Waits into your test scripts. Real-world examples and practical tips guide you in implementing synchronization strategies effortlessly.
Python with Selenium Course: Synchronization Mastery
Elevate Your Skills with our Course. Ready to master synchronization? Our Python with Selenium course not only covers the basics but dives deep into synchronization strategies, making you a pro at orchestrating perfectly timed Selenium tests.
Conclusion
In the rhythm of Selenium Waits, we find the heartbeat of efficient automation testing. Precision, patience, and a touch of artistry—these are the elements that transform learn python selenium from mere scripts into a symphony of flawless execution.
FAQs (Frequently Asked Questions)
1. Why is synchronization crucial in automation testing?
Synchronization ensures that automation tests run seamlessly by keeping them in harmony with the dynamic nature of web elements.
2. How do Implicit Waits differ from Explicit Waits?
Implicit Waits introduce a global wait time, while Explicit Waits allow you to specify conditions and durations, offering more precise control over synchronization.
3. Can Selenium Waits handle dynamically changing elements?
Absolutely! Selenium Waits come equipped with strategies to handle dynamic elements, ensuring your tests remain robust and adaptable.
4. Are there recommended wait times for Selenium Waits?
Wait times depend on various factors, and there's no one-size-fits-all approach. Best practices involve setting realistic wait times based on the nature of the web application.
5. How can I integrate Selenium Waits into my existing Python with Selenium tests?
Integrating Selenium Waits is straightforward. Our Python with Selenium course provides hands-on guidance, showing you how to seamlessly implement synchronization strategies into your existing tests.
Embark on your synchronization journey with Selenium Waits. Master the art of precision and patience, ensuring your automation tests dance in perfect harmony!
0 notes
Text
famed verification — don’t
summary — a toss in of a random song she said she’d take part in. doesn’t expect it turn into hours of replaying old memories. warnings — none wc — 638 (not including lyrics)
recordings take a break, she just loses herself in the process. loses any semblance of creative liberation, along with any melody that comes from her two hands. three hours into staring at the screen, and she’s left still with a tabula rosa canvas — the only direction: try again.
right timings occur when the rap on the door pries herself away from the minutes of self-agonizing frustration, her eyes peek past to the visitor.
an old friend, she welcomes with open arms. motions to the empty sofa lying in the studio (as if it’s her own, this is no home. this is a makeshift prison).
“what brings you to my side of town?”
“a proposition — a song, your song actually. with the catalyst member.”
“so, i’ve heard.”
meeting rooms, and exploitation of a fundamental friendship as a storyline for cheap tv. it sells, makes her into another product, tacking on another reminder of things to do when her response is low, and she’s thwarted hours in creating anything of substance.
yet, one toss of a usb, and one wry smile yanked from a producer friend. she knows, it’s a proposition for another game.
“instructions and rough base of the song is there. make use of time, and maybe — i’ll stop by with a coffee when you’re not forced to be here.”
-
read.txt
song about dwindling lovers, alcohol — courage? or the start to the downfall? rap written as a base to frame, see what you make do with it. if not, guess i’ll have to write the rest. but i’m lazy, so good luck seo minjung
ps: know i’ll charge a dior fee if i have to write the rest
-
lovers and alcohol, two things she fails at. a dwindling time bomb for when the alcohol laces her veins, and suddenly she wears a false sense of confidence, inside a chasm where the past mistakes become re-written with the truth that speaks tonight.
alcohol’s a dangerous weapon, handled with care. (she’s careless, always has been when falling into temptation leads to the five seconds of euphoria). it’s not her fault, no. she refuses (knows it’s her fault anyway) when memories always begin with the echoes of footsteps coming closer to her one by one, her heart loosely caught in the palm of her hand. hands raised, she falls with the devilish touch of alcohol.
it’s dangerous, a close call holding on by a thread
i can only see it as temptation
don’t come to me, don’t
because it always starts at the same story. her muse, a solo silhouette of the skeleton that doesn’t give despite how many times she’s locked it deep in her head. her head says don’t, her heart says, yes. and you know the dangerous aftermath of what comes with the asynchrony of the heart and head. the heart wins out. doesn’t matter how many times the words she utters fall into a don’t, her eyes speak differently.
don’t cross the line, please don’t give me the alcohol, don’t i might try to make it work with you if drunk
the aftermath already follows suit before it all starts. the cataclysmic mash-up of too many drinks and the courage that doesn’t fade despite how many more drinks she tries to upkeep the false sense of security in the moment. faux bravado — it’s a dangerous thing. wrapping her up underneath its finger when her head tells her once more, it’s only temporary as with most things. her heart says something else: regrets or not, she’s already decided.
alcohol no longer feels good. impulse no longer feels smart.
creative liberation or not, she’s still stuck writing the same lines over and over for someone who’s only an illusion of the past.
she types up the note document into one. hours staged in flashbacks she ought to forget — never forget, it always resurfaces in the studio. types it into a document, attaches the vocal guide before packing it all into an email to press send.
figures, it’s a day that’s already bled into the next.
2 notes
·
View notes
Text
Flutter Crash Course for JavaScript Developers

Welcome! I’m glad you’re here again for some more Dart and Flutter magic.
✨ In the previous episode of this series, we looked at Dart and went from basically zero to hero with all those types, classes and asynchrony. I hope you had enough practice on Dart because today, we’ll move forward to Flutter. Let’s get started!
Quick heads up: the “👉” emoji will compare JS and React with Dart and Flutter language examples as of now. Just like in the previous episode,, the left side will be the JS/React, and the right side will be the Dart/Flutter equivalent, e.g. console.log("hi!"); 👉 print("hello!");
What is Flutter, and why we’ll use it
Flutter and Dart are both made by Google. While Dart is a programming language, Flutter is a UI toolkit that can compile to native Android and iOS code. Flutter has experimental web and desktop app support, and it’s the native framework for building apps for Google’s Fuchsia OS.
This means that you don’t need to worry about the platform, and you can focus on the product itself. The compiled app is always native code as Dart compiles to ARM, hence providing you the best cross-platform performance you can get right now with over 60 fps.
Flutter also helps the fast development cycle with stateful hot reload, which we’ll make use of mostly in the last episode of this series.
Intro to the Flutter CLI
When building apps with Flutter, one of the main tools on your belt is the Flutter CLI. With the CLI, you can create new Flutter projects, run tests on them, build them, and run them on your simulators or emulators. The CLI is available on Windows, Linux, macOS and x64-based ChromeOS systems.
Once you have the CLI installed, you’ll also need either Android Studio, Xcode, or both, depending on your desired target platform(s).
(Flutter is also available on the web and for desktop, but they are still experimental, so this tutorial will only cover the Android and iOS related parts).
If you don’t wish to use Android Studio for development, I recommend VSCode. You can also install the Dart and Flutter plugins for Visual Studio Code.
Once you’re all set with all these new software, you should be able to run flutter doctor. This utility will check if everything is working properly on your machine. At the time of writing, Flutter printed this into the console for me:
[✓] Flutter (Channel stable, v1.17.4, on Mac OS X 10.15.4 19E287, locale en-HU) [✓] Android toolchain - develop for Android devices (Android SDK version 29.0.2) [✓] Xcode - develop for iOS and macOS (Xcode 11.5) [!] Android Studio (version 3.5) ✗ Flutter plugin not installed; this adds Flutter specific functionality. ✗ Dart plugin not installed; this adds Dart specific functionality. [✓] VS Code (version 1.46.1) [!] Connected device ! No devices available
You should get similar results for at least for the Flutter part too. Everything else depends on your desired target platforms and your preferred IDEs like Android Studio or VS Code. If you get an X for something, check again if everything is set up properly.
Only move forward in this tutorial if everything works properly.
To create a new Flutter project, cd into your preferred working directory, and run flutter create <projectname>. The CLI will create a directory and place the project files in there. If you use VS Code on macOS with an iOS target, you can use this little snippet to speed up your development process:
# Create a new project flutter create <projectname> # move there cd projectname # open VS code editor code . # open iOS Simulator - be patient, it may take a while open -a Simulator.app # start running the app flutter run
And boom, you’re all set! 💅
If you don’t wish to use the iOS simulator, you can always spin up your Android Studio emulator. Use Genymotion (or any other Android emulation software), or even connect a real device to your machine. This is a slower and more error-prone solution, so I recommend to only test on real devices when necessary.
Once they have booted, you can run flutter doctor again and see if Flutter sees the connected device. You should get an output something just like this:
... [✓] Connected device (1 available) ...
If you got this output - congratulations! 🎉 You’re all set to move on with this tutorial. If, for some reason Flutter didn’t recognize your device, please go back and check everything again as you won’t be able to follow the instructions from now on.
Hello world! 🌍
If you didn’t run the magic snippet previously, run these commands now:
# Create a new project flutter create <projectname> # move there cd projectname # open VS code editor (optional if you use Studio) code . # start running the app flutter run
This will spin up the Flutter development server with stateful hot reload and a lot more for you. You’ll see, that by default, Flutter creates a project with a floating action button and a counter:
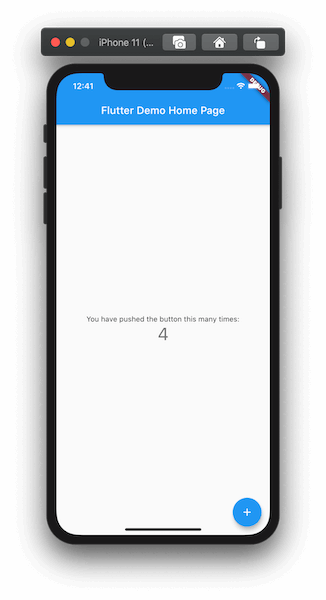
Once you’re finished with playing around the counter, let’s dig into the code! 👨💻
Flutter project structure
Before we dig right into the code, let’s take a look at the project structure of our Flutter app for a moment:
├── README.md ├── android │ └── ton of stuff going on here... ├── build │ └── ton of stuff going on here... ├── ios │ └── ton of stuff going on here... ├── lib │ └── main.dart ├── pubspec.lock ├── pubspec.yaml └── test └── widget_test.dart
We have a few platform-specific directories: android and ios. These contain the necessary stuff for building, like the AndroidManifest, build.gradle, or your xcodeproj.
At this moment, we don’t need to modify the contents of these directories so we’ll ignore them for now. We’ll also ignore the test directory as we won’t cover testing Flutter in this series (but we may look into it later if there’s interest 👀), so that only leaves us to these:
├── lib │ └── main.dart ├── pubspec.lock ├── pubspec.yaml
And this is where the magic happens. Inside the lib directory, you have the main.dart: that’s where all the code lives right now. We’ll peek into it later, but let’s just have a look at the pubspec.yaml and pubspec.lock.
What are those?

Package management in Flutter - pub.dev
When building a project with JavaScript, we often use third party components, modules, packages, libraries, and frameworks so that we don’t have to reinvent the wheel. The JavaScript ecosystem has npm and yarn to provide you with all those spicy zeroes and ones, and they also handle the dependencies inside your project.
In the Dart ecosystem, this is all handled by pub.dev.
So, just a few quick facts: npm 👉 pub.dev package.json 👉 pubspec.yaml package-lock.json 👉 pubspec.lock
We’ll look into installing packages and importing them into our app in the last episode of this series, in which we’ll create a fun mini-game.
Digging into the Dart code
The only thing left from the file tree is main.dart. main is the heart of our app, it’s like the index.js of most JS-based projects. By default, when creating a project with flutter create, you’ll get a very well documented code with a StatelessWidget, a StatefulWidget, and its State.
So instead of observing the demo code line by line together, I encourage you to read the generated code and comments by yourself and come back here later.
In the next part, we’ll look into what are widgets and the build method.
We’ll learn why it is @overrided, and what’s the difference between stateful and stateless widgets. Then we’ll delete all the code from main.dart and create a Hello world app by ourselves so that you can get the hang of writing declarative UI code in Flutter.
Go ahead, read the generated code and the documentation now! 👀
In Flutter, everything is a widget!
As you have been reading the code, you may have noticed a few things. The first thing after importing Flutter is the entry method I have been talking about in the previous episode:
void main() { runApp(MyApp()); }
And then, you could see all those classes and OOP stuff come back with the line class MyApp extends StatelessWidget.
First things first: in Flutter, everything is a widget! Oh, and speaking of widgets. Components 👉 Widgets!
The StatelessWidget is a class from the Flutter framework, and it’s a type of widget. Another kind of widget is StatefulWidget and we’ll look into the difference between those and how to use them later.
We can create our reusable widget by extending the base class StatelessWidget with our own build method. (By the way, render in ReactJS 👉 build in Flutter). We can see that the build returns a Widget because the return type is defined, and we can see an odd keyword in the previous line: @override.
It’s needed because the StatelessWidget class has a definition for build by default, but we want to replace it (or override it) with our own implementation - hence the keyword @override. Before we dig further into the code, let’s have a peek at using widgets in Flutter:
// using a React component <button onClick={() => console.log(‘clicked!’)}>Hi, I’m a button</button>
// using a Flutter widget RawMaterialButton( onPressed: () { print("hi, i'm pressed"); }, child: Text("press me!"), ),
You can see that Flutter has a different approach with declarative UI code.
Instead of wrapping children between ><s and passing props next to the component name (e.g. <button onClick ...), everything is treated as a property. This enables Flutter to create more flexible and well-typed widgets: we’ll always know if a child is supposed to be a standalone widget or if it can accept multiple widgets as a property, for example. This will come in handy later when we’ll build layouts with Rows and Columns.
Now that we know a bit more about widgets in Flutter, let’s take a look at the generated code again:
@override Widget build(BuildContext context) { return MaterialApp( title: 'Flutter Demo', theme: ThemeData( primarySwatch: Colors.blue, ), home: MyHomePage(title: 'Flutter Demo Home Page'), ); }
The build method returns a MaterialApp that has a type of Widget and - unsurprisingly - comes from Flutter. This MaterialApp widget is a skeleton for your Flutter app. It contains all the routes, theme data, metadata, locales, and other app-level black magic you want to have set up. 🧙
You can see the MyHomePage class being referenced as the home screen. It also has a property, title, set up. MyHomePage is also a widget, and we can confirm that by looking at the definition of this class.
Quick tip: if you are using VSCode as your editor, hold Command and hover or click on the class reference and you’ll be directed to the code of the class.
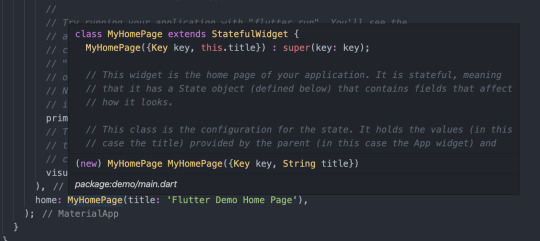
We can see that MyHomePage extends a StatefulWidget. However, the structure of the code itself is a bit squiggly and weird. What’s this MyHomePage({Key key, this.title}) : super(key: key); syntax? Why doesn’t this widget have a build method? What’s a State? What is createState?
To answer these questions, we’ll have to look into one of the more hard-code topics in Flutter: state management.
Local state management in Flutter: StatefulWidgets
I previously talked about the two main types of widgets in Flutter: StatelessWidgets and StatefulWidgets. StatelessWidgets are pretty straightforward: a snippet of code that returns a Widget, maybe some properties are being passed around, but that’s all complexity.
However, we don’t want to write applications that just display stuff! We want to add interactivity! And most interactions come with some state, whether it’s the data stored in an input field or some basic counter somewhere in your app. And once the state is updated, we want to re-render the affected widgets in our app - so that the new data is being displayed for the user.
Think of state management in React: it has the very same purpose with the goal of being as efficient as possible. It’s no different in Flutter: we want to have some very simple widgets (or StatelessWidgets), and some widgets with a bit of complexity and interactivity (or StatefulWidgets).
Let’s dive into the code: a StatefulWidget consists of two main components:
a StatefulWidget (that is called MyHomePage in our case)
a typed State object (that is called _MyHomePageState in this example)
We’ll call these “widget” and “state” (respectively) for the sake of simplicity. The widget itself contains all the props, and a createState overridden method. As you can see, the prop is marked with a final - that’s because you cannot change the prop from within the widget. When you modify a prop of a widget, Flutter throws the current instance away and creates a brand new StatefulWidget.
Note that changing either the prop or the state will trigger a rebuild in Flutter - the key difference between the two is that changing the state can be initiated from within the widget while changing a prop is initiated by the parent widget.
Props help you pass data from parent to children. State helps you handle data change inside the children.
Now, let’s look into changing the state: inside the widget, we have a createState method that only returns the state, _MyHomePageState(). When modifying the state with the setState method, this createState method gets called and returns a new instance of your state. The old instance gets thrown away, and a new instance of your widget will be inserted into the widget tree.
(Sidenote: the widget tree is only a blueprint of your app, the element tree is the one that gets rendered for the user. It’s a bit more advanced, under-the-hood topic, so it won’t be covered in this series - however, I’ll link some video resources later on that will help you understand how Flutter works and what’s the deal with the widget tree and the element tree.)
The _MyHomePageState class has a type of State, typed with MyHomePage.
This is needed so that you can access the properties set in the MyHomePage instance with the widget keyword - for example, to access the title prop, write widget.title. Inside the state, you have an overridden build method, just like you’d see in a typical StatelessWidget. This method returns a widget that renders some nice data, both from props (widget.title) and from the state (_counter).
Notice that you don’t need to type in anything before the _counter. No this.state._counter, no State.of(context)._counter, just a plain old _counter. That’s because from the perspective of the code, this variable is declared just like any other would be:
int _counter = 0;
However, when modifying this variable, we need to wrap our code in setState, like this:
setState(() { _counter++; });
This will tell Flutter that “Hey! It’s time to re-render me!”.
The framework will call the previously discussed createState method; a new instance of your state gets created; built; rendered; and boom! 💥 The new data is now on-screen.
It may seem a bit complicated or seem like you have to write a lot of boilerplate code to get this running. But don’t worry! With VS Code, you can refactor any StatelessWidget into a stateful one with just one click:
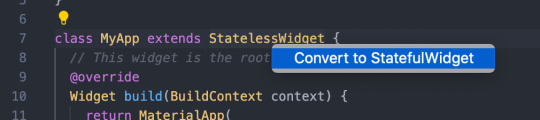
And that’s it for managing your widget’s state! It may be a lot at first, but you’ll get used to it after building a few widgets.
A few notes about global state management in Flutter
Right now, we only looked at working with local state in Flutter - handling app-level, or global state is a bit more complex. There are, just like in JS, tons of solutions, ranging from the built-in InheritedWidget to a number of third-party state management libraries. Some of those may already be familiar, for example, there is RxDart and Redux, just to name a few. To learn more about the most popular solutions, and which one to choose for your project, I suggest you watch this awesome video about global state management in Flutter by Fireship.
Widgets, widgets, and widgets
I already talked about how everything is a widget in Flutter - however, I didn’t really introduce you to some of the most useful and popular widgets in Flutter, so let’s have a look at them before we move on!
Flutter has widgets for displaying texts, buttons, native controls like switches and sliders (cupertino for iOS and material for Android style widgets), layout widgets like Stack, Row, Column and more. There are literally hundreds of widgets that are available for you out of the box, and the list keeps growing.
The whole widget library can be found here in the Widget Catalog, and the Flutter team is also working on a very nice video series with new episodes being released weekly. This series is called Flutter Widget of the Week, and they introduce you to a Flutter widget, it’s use cases, show you code examples and more, in just about one minute! It’s really binge-worthy if you want to get to know some useful Flutter widgets, tips, and tricks.
Here a link for the whole series playlist, and here is the intro episode.
Some useful widgets in Flutter
As you’ll work with Flutter, you’ll explore more and more widgets, but there are some basic Flutter widgets you’ll absolutely need to build your first application. (We’ll probably use most of them in the next and last episode of this series, so stay tuned!)
First and foremost: Text.
The Text widget delivers what its name promises: you can display strings with it. You can also style or format your text and even make multiline texts. (There’s are a lot of line of text-related widgets available, covering your needs from displaying rich text fields to creating selectable texts.)
An example Text widget in Flutter:
Text('hello world!'),
Adding buttons to your Flutter app is also easy as one two three. There are numerous button-related widgets available for you ranging from RawMaterialButton to FlatButton, IconButton, and RaisedButton, and there are also specific widgets for creating FloatingActionButtons and OutlineButtons. I randomly picked 🎲 the RaisedButton for us so that we can have a peek at how easy it is to add a nice, stylish button into our app:
RaisedButton( onPressed: () { print( "hi! it's me, the button, speaking via the console. over.", ); }, child: Text("press meeeeeee"), ),
Building layouts in Flutter
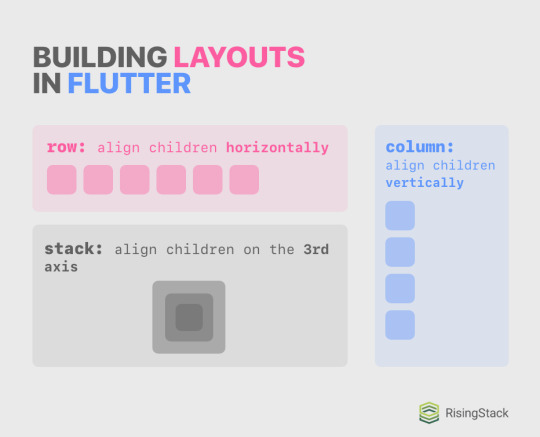
When building flexible and complex layouts on the web and in React-Native, the most important tool you used was flexbox. While Flutter isn’t a web-based UI library and hence lacks flexbox, the main concept of using flexible containers with directions and whatnot is implemented and preferred in Flutter. It can be achieved by using Rows and Columns, and you can stack widgets on each other by using Stacks.
Consider the following cheatsheet I made:
Remember how I previously praised typing the props of a widget and how it’s one of the best tools in Flutter’s declarative UI pattern? The Row, Column and Stack widgets all have a children property that want an array of widgets, or [Widget]. Lucky for you, the VS Code automatically completes the code for you once you start working with these widgets:
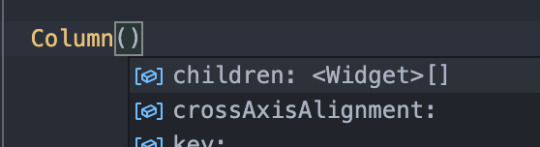
Just hit tab to let Code complete the code for you! Maybe in the future, you won’t need to write code at all, Flutter will just suck out the app idea out of your brain and compile that - but until then, get used to hitting tab.
Let’s look at an example where we display some names underneath each other:
Column( children: <Widget>[ Text("Mark"), Text("Imola"), Text("Martin"), Text("Zoe"), ], ),
You can see that you create a typed list with the <Widget>[] syntax, you pass it as a prop for the Column, create some amazing widgets inside the list, and boom! The children will be displayed underneath each other. Don’t believe me? Believe this amazing screenshot. 📸

Alignment
The real power of Columns and Rows isn’t just placing stuff next to each other, just like flexbox isn’t only about flex-direction either. In Flutter, you can align the children of a Column and Row on two axes, mainAxis and crossAxis.
These two properties are contextual: whilst in a Row, the main axis would be horizontal, and the crossing axis would be vertical, it would be switched in a Column. To help you better understand this axis concept, I created a handy cheat sheet with code examples and more.
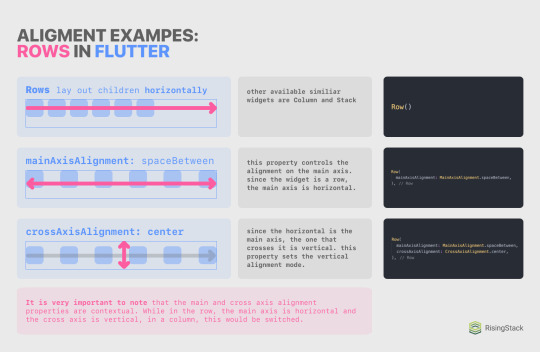
So, for example, if you want to perfectly center something, you’d want to use either the Center widget; or a Row or Column with both mainAxisAlignment and crossAxisAlignment set to .center; or a Row and Column with their mainAxisAlignments set to .center. The possibilities are basically endless with these widgets! ✨
Rendering lists (FlatLists 👉 ListViews)
Whilst thinking about possible use cases for columns, you may have wondered about creating scrollable, dynamic, reorderable, or endless lists.
While these features could be achieved by using Columns, it would take a lot of effort to do so, not even mentioning updating your list data or lazy rendering widgets when there’s a crapton of data. Lucky you, Flutter has a class for rendering lists of data, and it’s called a ListView!
There are several ways to use a ListView, but the most important ones are the ListView(...) widget and the ListView.builder method. Both of them achieve the very same functionality from the perspective of the user, but programmatically, they differ big time.
First, let’s look into the ListView(..) widget. Syntactically, they are very similar to a Column except that they lack the main and cross-axis alignment properties. To continue on with our previous example for columns when we placed names under each other, I’ll display the very same column converted into a ListView:
ListView( children: <Widget>[ Text("Mark"), Text("Imola"), Text("Martin"), Text("Zoe"), ], ),
Tada! 🎉 Your first ListView in Flutter! When refreshing or rebuilding the app (by either pressing a small or capital R in the Flutter CLI), you’ll see the very same thing you saw previously.
However, if you try to drag it, you are now able to scroll inside the container! Note that when a Column has bigger children than its bounds, it will overflow, but a ListView will be scrollable.
ListView builder
While the ListView widget is cool and good, it may not be suitable for every use case. For example, when displaying a list of tasks in a todo app, you won’t exactly know the number of items in your list while writing the code, and it may even change over time. Sure, you are able to run .map on the data source, return widgets as results, and then spread it with the ... operator, but that obviously wouldn’t be performant, nor is it a good practice for long lists. Instead, Flutter provides us a really nice ListView builder.
Sidenote: while working with Flutter, you’ll see the word “builder” a lot. For example, in places like FutureBuilder, StreamBuilder, AnimatedBuilder, the build method, the ListView builder, and more. It’s just a fancy word for methods that return a Widget or [Widget], don’t let this word intimidate or confuse you!
So how do we work with this awesome method? First, you should have an array or list that the builder can iterate over. I’ll quickly define an array with some names in it:
final List<String> source = ["Sarah", "Mac", "Jane", "Daniel"];
And then, somewhere in your widget tree, you should be able to call the ListView.builder method, provide some properties, and you’ll be good to go:
ListView.builder( itemCount: source.length, itemBuilder: (BuildContext context, int i) => Text(source[i]), ),
Oh, and notice how I was able to use an arrow function, just like in JavaScript!
The itemCount parameter is not required, but it’s recommended. Flutter will be able to optimize your app better if you provide this parameter. You can also limit the maximum number of rendered items by providing a number smaller than the length of your data source.
When in doubt, you can always have a peek at the documentation of a class, method, or widget by hovering over its name in your editor:

And that sums up the layout and list-related part of this episode. We’ll look into providing “stylesheets” (or theme data) for your app, look at some basic routing (or navigation) methods, and fetch some data from the interwebs with HTTP requests.
Theming in Flutter
While building larger applications with custom UI components, you may want to create stylesheets. In Flutter, they are called Themes, and they can be used in a lot of places. For example, you can set a default app color, and then the selected texts, buttons, ripple animations, and more will follow this color. You can also set up text styles (like headings and more), and you’ll be able to access these styles across the app.
To do so, you should provide a theme property for your MaterialApp at the root level of the application. Here’s an example:
return MaterialApp( title: 'RisingStack Flutter Demo', theme: ThemeData( // Define the default brightness and colors. brightness: Brightness.light, primaryColor: Colors.green[300], accentColor: Colors.green, // Define button theme buttonTheme: ButtonThemeData( buttonColor: Colors.green, shape: CircleBorder(), ), // Define the default font family // (this won’t work as we won’t have this font asset yet) fontFamily: 'Montserrat', // Define the default TextTheme. Use this to specify the default // text styling for headlines, titles, bodies of text, and more. textTheme: TextTheme( headline1: TextStyle(fontSize: 72.0, fontWeight: FontWeight.bold), headline6: TextStyle(fontSize: 36.0, fontStyle: FontStyle.italic), bodyText2: TextStyle(fontSize: 14.0, fontFamily: 'Muli'), ), ), home: Scaffold(...), );
These colors will be used throughout our app, and accessing the text themes is also simple as a pickle! I added a RaisedButton on top of the app so that we can see the new ButtonThemeData being applied to it:

It’s ugly and all, but it’s ours! 🍋 Applying the text style won’t be automatic, though. As we previously discussed, Flutter can’t really read your mind, so you explicitly need to tag Text widgets as a headline1 or bodyText2, for example.
To do so, you’ll use the Theme.of(context) method. This will look up the widget tree for the nearest Theme providing widget (and note that you can create custom or local themes for subparts of your app with the Theme widget!) and return that theme. Let’s look at an example:
Text( "cool names", style: Theme.of(context).textTheme.headline6, ),
You can see that we are accessing the theme with the Theme.of(context) method, and then we are just accessing properties like it’s an object. This is all you need to know about theming a Flutter app as it really isn’t a complex topic!
Designing mobile navigation experiences
On the web, when managing different screens of the app, we used paths (e.g. fancysite.com/registration) and routing (e.g., react-router) to handle navigating back and forth the app. In a mobile app, it works a bit differently, so I’ll first introduce you to navigation on mobile, and then we’ll look into implementing it in Flutter.
Mobile navigation differs from the web in a lot of ways. Gestures and animations play a very heavy role in structuring out the hierarchy of the app for your user. For example, when a user navigates to a new screen, and it slides in from the right side of the screen, the user will expect to be able to move back with a slide from the left. Users also don’t expect flashy loadings and empty screens when navigating - and even though there are advancements on the web in this segment (e.g. PWAs), it’s by far not the default experience when using websites.
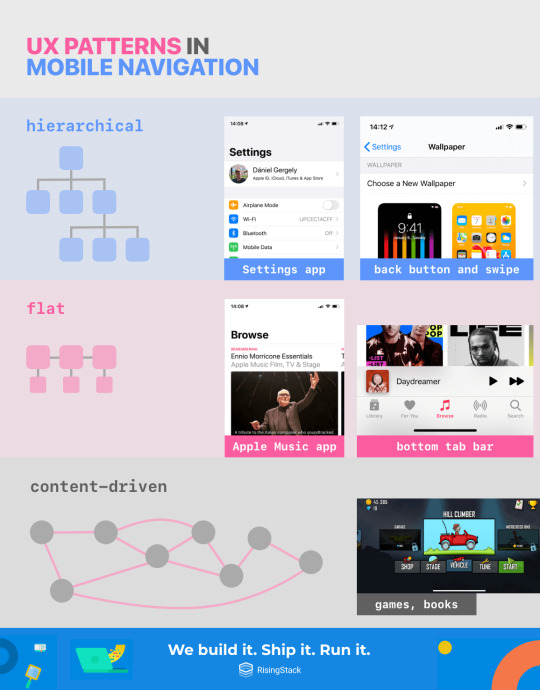
There are also different hierarchies when designing mobile apps. The three main groups are:
Hierarchical Navigation (e.g. the Settings app on iOS)
New screens slide in from left to right. The expected behavior for navigating back is with a back button on the upper left corner and by swiping from the left edge of the screen to the right.
Flat Navigation (e.g. the Apple Music app)
The default behavior for this hierarchy is a tab bar on the bottom.
Tabs should always preserve location (e.g. if you navigate to a subscreen inside on tab one, switch to tab two and switch back to tab one, you’d expect to be on the subscreen, not on the root level screen.)
Swiping between tabs is optional. It isn’t the default behavior and it may conflict with other gestures on the screen itself - be cautious and think twice before implementing swipeable tab bars.
Custom, content-driven, or experimental navigation (Games, books and other content)
When making experimental navigation, always try to be sane with the navigation. The user should always be able to navigate back and undo stuff.
I created a handy cheat sheet for you that will remind you of the most important things when in doubt:
Also, all of these can be mixed together, and other screens like modals can be added to the stack. Always try to KISS and make sure that the user can always navigate back and undo things. Don’t try to reinvent the wheel with navigation (e.g., reverse the direction of opening up a new screen) as it will just confuse the user.
Also, always indicate where the user is in the hierarchy (e.g., with labeling buttons, app title bar, coloring the bottom bar icons, showing little dots, etc.). If you want to know more about designing mobile navigation experiences and implementing them in a way that feels natural to the user, check out Apple’s Human Interface Guideline’s related articles.

Navigation in Flutter
When routing on the web with React or React-Native, you had to depend on third-party libraries to get the dirty work done for you (e.g. react-router). Luckily, Flutter has native navigation capabilities out of the box, and they cover every need of most of the apps, and they are provided to you via the Navigator API.
The applications of this API and the possibilities to play around with navigation are endless. You can, for example, animate a widget between screens; build a bottom navigation bar or a hamburger menu; pass arguments; or send data back and forth. You can explore every navigation-related Flutter cookbook here. In this series, we’ll only look into initializing two screens, navigating between them, and sharing some widgets between them.
To get started with navigation, let’s create two widgets that we’ll use as screens and pass the first into a MaterialApp as the home property:
import 'package:flutter/material.dart'; void main() { runApp(MyApp()); } class MyApp extends StatelessWidget { @override Widget build(BuildContext context) { return MaterialApp( title: 'Flutter Demo', home: ScreenOne(), ); } } class ScreenOne extends StatelessWidget { @override Widget build(BuildContext context) { return Scaffold( body: Center( child: Text("hey! 👋"), ), ); } } class ScreenTwo extends StatelessWidget { @override Widget build(BuildContext context) { return Scaffold( body: Center( child: Text("hi! 👋👋"), ), ); } }
This was easy as a breeze. If you run this app in a simulator, you’ll see “hey! 👋” on the center of the screen. Now, inside the MaterialApp, we can define our routes:
return MaterialApp( title: 'Flutter Demo', home: ScreenOne(), routes: <String, WidgetBuilder>{ '/hey': (BuildContext context) => ScreenOne(), '/hi': (BuildContext context) => ScreenTwo(), }, );
Then, we’ll need something that will trigger the navigation. I’ll add a RaisedButton to the ScreenOne:
return Scaffold( body: Column( mainAxisAlignment: MainAxisAlignment.center, crossAxisAlignment: CrossAxisAlignment.center, children: <Widget>[ Text("hey! 👋"), RaisedButton( child: Text("take me there"), onPressed: () { print("hi!"); }, ), ], ), );
And now, we can navigate the user to the next screen when the button is pressed. Notice that I replaced the Center with a Column with both its main and cross axises centered. This was required because I wanted to have two children underneath each other: a Text and a RaisedButton. Inside the RaisedButton, we only have to push the route to the stack and let Flutter handle the routing and animation:
Navigator.pushNamed(context, '/hi');
By default, we can navigate back to the previous screen by swiping from the left edge of the screen. This is the expected behavior, and we don’t intend to change it, so we’ll leave it as it is. If you want to add a button on the second screen to navigate back to the first screen, you can use Navigator.pop(); method.
Don’t ever push to the same screen the user is on, nor the previous screen. Always use pop when navigating backward.
This will be just enough to cover your basic navigation needs. Don’t forget, if you want to check out more advanced navigation features such as animating widgets between screens or passing data back and forth, check out the related Flutter cookbooks.
Networking, HTTP requests
Now that you can build widgets, layouts, display lists, and you can navigate between screens with Flutter, there’s only one thing left: communicating with your backend API. One of the most popular BaaS providers for mobile and Flutter is Firebase by Google. It allows you to use real-time databases, push notifications, crash reporting, app analytics, and a lot more out of the box. You can find the Flutter Firebase packages on pub.dev or you can follow this step-by-step tutorial.
If you are a more experienced developer and you have a complex project with a custom backend in mind, or if you are just genuinely looking forward to using your own selection of backend APIs - Firebase just won’t suit your needs.
That’s where the http package comes in handy.
Just add it into your dependency list inside the pubspec.yaml, wait until flutter pub get finishes (VSCode automatically runs it for you if it detects changes in the pubspec.yaml), and then continue reading:
dependencies: flutter: sdk: flutter http: any
http is a Future-based library for making HTTP requests. To get started with it, just import it:
import 'package:http/http.dart' as http;
And then, you can start making requests with top-level methods like http.post or http.get. To help you experiment with making HTTP requests in Flutter, I have made a demo API that you can GET on. It will return some names and ages. You can access it here (https://demo-flutter-api.herokuapp.com/people).
Parsing JSON data in Flutter and Dart
After making your GET request on the API, you’ll be able to get data out of it by accessing properties like this:
void request() async { final response = await http.get("https://demo-flutter-api.herokuapp.com/people"); print(response.body); // => [{"name":"Leo","age":17},{"name":"Isabella","age":30},{"name":"Michael","age":23},{"name":"Sarah","age":12}] print(json.decode(response.body)[0]["name"]); // => Leo }
However, this solution should not be used in production. Not only it lacks automatic code completion and developer tooling, but it’s very error-prone and not really well documented. It’s just straight-up crap coding. 💩
Instead, you should always create a Dart class with the desired data structure for your response object and then process the raw body into a native Dart object. Since we are receiving an array of objects, in Dart, we’ll create a typed List with a custom class. I’ll name the class Person, and it will have two properties: a name (with a type of String) and age (int). I’ll also want to define a .fromJson constructor on it so that we can set up our class to be able to construct itself from a raw JSON string.
First, you’ll want to import dart:convert to access native JSON-related methods like a JSON encoder and decoder:
import 'dart:convert';
Create our very basic class:
class Person { String name; int age; }
Extend it with a simple constructor:
Person({this.name, this.age});
And add in the .fromJson method, tagged with the factory keyword. This keyword informs the compiler that this isn’t a method on the class instance itself. Instead, it will return a new instance of our class:
factory Person.fromJson(String str) => Person.fromMap(json.decode(str)); factory Person.fromMap(Map<String, dynamic> json) => new Person( name: json["name"], age: json["age"], );
Notice that I created two separate methods: a fromMap and a fromJson. The fromMap method itself does the dirty work by deconstructing the received Map. The fromJson just parses our JSON string and passes it into the fromMap factory method.
Now, we should just map over our raw response, use the .fromMap factory method, and expect everything to go just fine:
List<Person> listOfPeople = json .decode(response.body) .map<Person>((i) => Person.fromMap(i)) .toList(); print(listOfPeople[0].name); // => Leo
Sidenote: I didn’t use the .fromJson method because we already parsed the body before mapping over it, hence it’s unneeded right now.
There is a lot to unwrap in these few lines! First, we define a typed list and decode the response.body. Then, we map over it, and we throw in the return type <Person> to the map so that Dart will know that we expect to see a Person as a result of the map function. Then, we convert it to a List as otherwise it would be an MappedListIterable.
Rendering the parsed JSON: FutureBuilder and ListView.builder
Now that we have our app up and running with our basic backend, it’s time to render our data. We already discussed the ListView.builder API, so we’ll just work with that.
But before we get into rendering the list itself, we want to handle some state changes: the response may be undefined at the moment of rendering (because it is still loading), and we may get an error as a response. There are several great approaches to wrap your head around handling these states, but we’ll use FutureBuilder now for the sake of practicing using new Flutter widgets.
FutureBuilder is a Flutter widget that takes a Future and a builder as a property. This builder will return the widget we want to render on the different states as the Future progresses.
Note that FutureBuilder handles state changes inside the widget itself, so you can still use it in a StatelessWidget! Since the http package is Future-based, we can just use the http.get method as the Future for our FutureBuilder:
@override Widget build(BuildContext context) { return Scaffold( body: FutureBuilder( future: http.get("https://demo-flutter-api.herokuapp.com/people"), ), ); }
And we should also pass a builder. This builder should be able to respond to three states: loading, done and error. At first, I’ll just throw in a centered CircularProgressIndicator() to see that our app renders something:
return Scaffold( body: FutureBuilder( future: http.get("https://demo-flutter-api.herokuapp.com/people"), builder: (BuildContext context, AsyncSnapshot<http.Response> response) { return Center( child: CircularProgressIndicator(), ); }, ), );
If you run this app, you’ll see a progress indicator in the center of the screen running indefinitely. We can get the state of the response by the response.hasData property:
builder: (BuildContext context, AsyncSnapshot<http.Response> response) { if (response.hasData) { // loaded! } else if (response.hasError) { // error! return Center( child: Text("error!"), ); } else { // loading... return Center( child: CircularProgressIndicator(), ); } },
And now, we can be sure that nothing comes between us and processing, then rendering the data, so inside the response.hasData block, we’ll process the raw response with previously discussed parsing and mapping method, then return a ListView.builder:
// loaded! List<Person> listOfPeople = json .decode(response.data.body) .map<Person>((i) => Person.fromMap(i)) .toList(); return ListView.builder( itemCount: listOfPeople.length, itemBuilder: (BuildContext context, int i) => Text( "${listOfPeople[i].name} (${listOfPeople[i].age})", ), );
And that’s it! 🎉 If you run this snippet right now, it will render four names and their corresponding ages next to them. Isn’t this amazing? It may have seemed like a lot of work for a simple list like this, but don’t forget that we created a whole-blown class, parsed JSON, and converted it into class instances, and we even handled loading and error states.
Summing it all up
Congratulations on making it this far into the course! You have learned a lot and came along a long way since we started in the previous episode.
You went from zero to hero both with Dart (types, control flow statements, data structures, OOP, and asynchrony) and Flutter (CLI, widgets, alignment, lists, themes, navigation and networking).
This really has been a lot of work, and you’ll still have to learn a lot until you get fluent in Flutter, but in the end, the only thing that will matter is the result of your hard work. And that’s what we’re going to harvest in the next and last episode of this Flutter series: we’ll build a fun mini-game with Flutter! 🎲
I’m really looking forward to seeing you here next week. Until then, stay tuned, and happy Fluttering! ✌️
All the bests, 🍻 Daniel from RisingStack
Flutter Crash Course for JavaScript Developers published first on https://koresolpage.tumblr.com/
0 notes
Text
How to become a Web Developer: a detailed plan for learning JavaScript

Everyone who wants to become an IT developer usually begins with making sites, as the easiest part of it. To work, you need only a text editor for writing the code and browser to see visually what you are doing. If you're not aiming to a full-stack approach and you just want learn the magic of client-side programming, you won't have to study complicated algorithms: as a matter of fact, the main skill each client-side web developer must have nowadays is the knowledge of JavaScript (and its frameworks). The best way to learn is by creating own website using multiple technologies. For example, you can create website and display stats from popular games like Counter-Strike and Valorant. Such a project requires HTML, CSS, Git, Bootstrap, JavaScript, Bash, MySQL. A nice example is the Valorant Tracker project, which is something that could be done in 4-6 months if you're willing to learning JavaScript programming. Once you manage to pull off something like that, you'll have a good chance to get hired as a junior code in a decent company and start your developer career. Nowadays, JS has been developing incredibly fast, so it's easy to get confused while studying this language. We offer you an educational plan with a convenient structure, where you will find all the main aspects of JavaScript and other adjacent technologies.
Why JavaScript?
We have to mention that language being pretty open - many companies are rivaling using JS with the goal of its evolution. The language is incredibly flexible, so it is perfect for people who like both object-oriented and functional approaches. A mammoth amount of different libraries and frameworks allows you to solve even the most difficult issues. Moreover, the server platform Node.js allows you to use JS not just in browsers but on the console. You can create apps for both smartphones and PC. Apps for a computer by using the Electron framework, and mobile apps thanks to NativeScript or ReactNative.
Git
The first thing you should do is to study how Git works: a source code manager is a vital instrument for developers, so you have to learn it first - since it's arguably the best choice nowadays. Here are three common topics you might start to learn to quickly understand the basics: Creation and moving of the files across catalogs. Initialization and commits in Git. Repositories settings in GitHub. Also, you must have the next skills: Object-oriented JS - constructors and factories. Functional JS - functions of the highest order, circuit, and recursion. Specification of the Jasmine tests. Basics of the HTML, CSS, and jQuery. To better understand these topics, be sure to check out our posts, guides and tutorials regarding Git and GitHub.
Algorithms and data structures
Later you have to learn algorithms (especially big complicated ones), and basic data structures: connected lists, turns, stacks, binary searching trees, and hash-tables.
Back-end JavaScript frameworks
Node.js - Approximately a decade ago JS was used only for writing the code for front-end (just like CSS and HTML), but today due to Node.js the situation is quite the opposite. Node - is a server area for committing all the actions by JS, so you won't have to learn all the new syntax. Although, you will have to import and export files, divide the entire code for modules, and use the pack-manager NPM. Express.js - Besides learning Node you have to get more knowledge about back-end development, especially about servers and routing. Ports and protocols with HTTP will be a nice start before studying Express. Express.js - Node-library for requests` processing.
Asynchronous JavaScript (AJAX)
If you don’t want to refresh your page after each change in your DB, Ajax is certainly what you will need - it sends asynchronous HTTP-request to reload only part of the page. You can work with Ajax through the jQuery (see below) or by directly (manually) handling the XMLHttpRequest object. Asynchrony is the thing that makes JS unique but separating developers into two sides: some love it and some hate. Each developer has to know both advantages and disadvantages of that technology. You can start by studying call stacks, events cycles, and callbacks, then - studying promises.
Databases, Schemes, Models, and ORM
Databases one of the most important parts of web development. If your app has to save or load some information without losing it just after the page's update, you definitely will have to use DB. You have to learn how to see the difference between relational and non-relational DB and learn their connection ways. The next step will be studying the SQL and different systems for controlling DB. Knowledge of ORM won't be excessive.
HTML and CSS
Those languages are the very basics of the web-design. You don't have to know them perfectly but understand their code. Then you will have to learn at least one popular library (for example, Bootstrap). For CSS you have to learn processors, like Sass that will make CSS more similar to the normal code. For making work with the HTML you can pick any template, like PUG. To better understand these topics, be sure to check out our posts, guides and tutorials regarding HTML, HTML5, CSS and CSS3.
jQuery and DOM manipulations
After you finished the main look of the page using HTML and CSS, you will use event translators and jQuery for the DOM controlling. Many people think that jQuery is useless and soon will be replaced by Angular or React. Maybe it's true, but jQuery is worldwide popular, so in any case, you must know it. Moreover, you can get into the situation when you will have to do an incredibly complicated job using React-microscope, so in that situation, light jQuery will be your salvation. To better understand these topics, be sure to check out our posts, guides and tutorials regarding JQuery.
Chrome instruments for developers
If we didn't mention the Chrome instrument which makes the programming job easier, we wouldn't forgive ourselves. Thanks to them you will be able to learn DOM, debugging process through the console, routes` tracking and so much more.
Test-Diven Development
Also called TDD: this is the development tactic when the software divides for a few tiny cycles: Writing down the code to make all changes you had to. Writing down the code that will pass all tests. Refactoring the code and writing new tests if those are necessary. If some parts of the code don't pass the test, they have to be rewritten. If you work with JS we firmly recommend you pay attention to the Jasmine, Chai, and Mocha frameworks. To better understand these topics, be sure to check out the ASP.NET Core 3 and Angular 9 book, which features an entire chapter about client-side TDD using the Karma test runner and Jasmine testing suite.
Web Sockets
We have to pay extra attention to that topic because web-sockets are useful. WebSocket protocol, unlike the HTTP one, will allow you to work with a bidirectional data stream – the reason why is that tech unique. The most popular library called socket.io and is well documented here.
EcmaScript 6 (ES2015)
Nowadays, the main standard is ES6 (ES2015), ES2016 has been confirmed already and the ES2017 is under development right now, so you always have to watch their updates and use the newest and most stable version. All compatibility problems can be solved easily with the next apps.
Babel
Babel - compiles ES6 (ES2016 support is expected soon) into the ES5, which is well-known by all browsers. It also can compile JSX/REACT-components, which makes it vital for web-developers. Webpack - takes all your files (images, fonts, style tables, JS-files, etc) into the single dependency graph. You don't have to use it if you are making a small app but shall use it while working with React.
React and Redux
React (also known as ReactJS) - the library which will allow you to create a user's interface. It was created by Facebook in 2013 and became worldwide popular pretty fast. React is needed not just for web-design, but there are versions for smartphones (React Native) and VR (React VR), published later by the same company. Redux - container of predictable states, usually used with React. It can be used for shortening the code by the modeling way. Pretty useful in real-time working apps with a big number of users, such as games. To better understand these topics, be sure to check out the series of React & ReactJS articles we've published in the last few years.
Authentication, Sessions, Cookies
You have to understand how the app will interact with users - how users will log in\out of their accounts, get bonuses, etc. For identifying people during surfing your site, web-sites using cookies - small text-files that send a reply from server to browser for user's HTTP request. For the connection between DB and log-in page, you can use the express-session library.
Web Security
Each site/app, of course, must be secure and reliable. You have to get the knowledge of all possible attacks on your creation and ways of protection as well. To better understand these topics, be sure to check out the various IT & Development Security articles we published in the last few years.
Conclusions
In this post we tried to write a list of the main study topics that await a novice JavaScript developer. Most of these tools will become your best friends, others will make you spit blood: each of them, however, will help you better understand how to overcome the inevitable difficulties that await your learning path and satisfy the development requests of the clients. Read the full article
#Ajax#Babel#Counter-Strike#CSS#Electron#ES2015#Express.js#Git#GitHub#HTML#Jasmine#Javascript#Karma#Node.js#React#Redux#Valorant
0 notes
Text
July 01, 2020 at 10:00PM - Angular 2 with TypeScript for Beginners: The Pragmatic Guide (8% discount) Ashraf
Angular 2 with TypeScript for Beginners: The Pragmatic Guide (8% discount) Hurry Offer Only Last For HoursSometime. Don't ever forget to share this post on Your Social media to be the first to tell your firends. This is not a fake stuff its real.
Description
Start building Angular 2 apps within minutes of this comprehensive, 7 hour course. You’ll learn this exciting new framework with hands-on lessons, and by building actual, real-world applications. Approved by Google Developer Expert, Todd Motto, this is the one-stop shop to master Angular 2.
Access 156 lectures & 7 hours of content 24/7
Master the core Angular 2 concepts & how to use them in building real-world apps
Understand & resolve common Angular 2 errors
Build single page applications (SPA)
Learn ways to write cleaner, more maintainable code, & build reusable components
Use Reactive Extensions & Observables to handle asynchrony
Connect to backend services & APIs
from Active Sales – SharewareOnSale https://ift.tt/2ZxWS3n https://ift.tt/eA8V8J via Blogger https://ift.tt/3dRvt1s #blogger #bloggingtips #bloggerlife #bloggersgetsocial #ontheblog #writersofinstagram #writingprompt #instapoetry #writerscommunity #writersofig #writersblock #writerlife #writtenword #instawriters #spilledink #wordgasm #creativewriting #poetsofinstagram #blackoutpoetry #poetsofig
0 notes
Photo

Simplify asynchronous programming with Kotlin’s coroutines Most mobile apps have to perform long-running or intensive operations — such as network calls or database operations — at some point. At any one time, your app might be playing a video, buffering the next section of video, and monitoring the network for possible interruptions, all while staying responsive to user input. This kind of multi-tasking might be standard behavior for Android apps, but it isn’t easy to implement. Android executes all its tasks by default on a single main UI thread, one task at a time. If this thread ever becomes blocked, your application is going to freeze, and may even crash. If your application will ever be capable of performing one or more tasks in the background, you’ll have to deal with multiple threads. Typically, this involves creating a background thread, performing some work on this thread, and posting the results back to Android’s main UI thread. However, juggling multiple threads is a complex process that can quickly result in verbose code that’s difficult to understand and prone to errors. Creating a thread is also an expensive process. Several solutions aim to simplify multi-threading on Android, such as the RxJava library and AsyncTask, providing ready-made worker threads. Even with the help of third party libraries and helper classes, multi-threading on Android is still a challenge. Let’s take a look at coroutines, an experimental feature of the Kotlin programming language that promises to take the pain out of asynchronous programming on Android. You can use coroutines to quickly and easily create threads, assign work to different threads, and perform long-running tasks on any thread (even Android’s main UI thread) without causing freezing or crashing your app. Why should I use coroutines? Learning any new technology takes time and effort, so before taking the plunge you’ll want to know what’s in it for you. Despite still being classed as experimental, there’s several reasons why coroutines are one of Kotlin’s most talked-about features. They’re a lightweight alternative to threads Think of coroutines as a lightweight alternative to threads. You can run thousands of them without any noticeable performance issues. Here we’re launching 200,000 coroutines and telling them to print “Hello World”: fun main(args: Array) = runBlocking { //Launch 200,000 coroutines// val jobs = List(200_000) { launch { delay(1000L) print("Hello world") } } jobs.forEach { it.join() } } } While the above code will run without any issues, spawning 200,000 threads will likely result in your application crashing with an OutOfMemory error. Even though coroutines are commonly referred to as an alternative to threads, they don’t necessarily replace them entirely. Threads still exist in an app based on coroutines. The key difference is that a single thread can run many coroutines, which helps keep your app’s thread count under control. Write your code sequentially, and let coroutines do the hard work! Asynchronous code can quickly become complicated, but coroutines let you express the logic of your asynchronous code sequentially. Simply write your lines of code, one after the other, and the kotlinx-coroutines-core library will figure out the asynchrony for you. Using coroutines, you can write asynchronous code as simply as if it were sequentially executed — even when it’s performing dozens of operations in the background. Avoid callback hell Handling asynchronous code execution usually requires some form of callback. If you’re performing a network call you’d typically implement onSuccess and onFailure callbacks. As callbacks increase, your code becomes more complex and difficult to read. Many developers refer to that problem as callback hell. Even if you’ve been dealing with asynchronous operations using the RxJava library, each RxJava call set usually ends with a few callbacks. With coroutines you don’t have to provide a callback for long-running operations. this results in more compact and less error-prone code. Your code will also be easier to read and maintain, as you won’t have to follow a trail of callbacks to figure out what’s actually going on. It’s flexible Coroutines provide much more flexibility than plain reactive programming. They give you have the freedom to write your code in a sequential way when reactive programming isn’t required. You can also write your code in a reactive programming style, using Kotlin’s set of operators on collections. Getting your project coroutine-ready Android Studio 3.0 and higher comes bundled with the Kotlin plugin. To create a project that supports Kotlin, you simply need to select the “Include Kotlin support” checkbox in Android Studio’s project creation wizard. This checkbox adds basic Kotlin support to your project, but since coroutines are currently stored in a separate kotlin.coroutines.experimental package, you’ll need to add a few additional dependencies: dependencies { //Add Kotlin-Coroutines-Core// implementation "org.jetbrains.kotlinx:kotlinx-coroutines-core:0.22.5" //Add Kotlin-Coroutines-Android// implementation "org.jetbrains.kotlinx:kotlinx-coroutines-android:0.22.5" Once coroutines are no longer considered experimental, they’ll be relocated to the kotlin.coroutines package. While coroutines still have experimental status, using any coroutine-related features will cause the Kotlin compiler to issue a warning. You can suppress this warning by opening your project’s gradle.properties file and adding the following: kotlin { experimental { coroutines "enable" } } Creating your first coroutines You can create a coroutine using either of the following coroutine builders: Launch The launch() function is one of the simplest ways to create a coroutine, so this is the method we’ll be using throughout this tutorial. The launch() function creates a new coroutine and returns a Job object without an associated result value. Since you can’t return a value from launch(), it’s roughly equivalent to creating a new thread with a Runnable object. In the following code, we’re creating a coroutine, instructing it to delay for 10 seconds, and printing “Hello World” to Android Studio’s Logcat. import android.support.v7.app.AppCompatActivity import android.os.Bundle import kotlinx.coroutines.experimental.delay import kotlinx.coroutines.experimental.launch class MainActivity : AppCompatActivity() { override fun onCreate(savedInstanceState: Bundle?) { super.onCreate(savedInstanceState) setContentView(R.layout.activity_main) launch { delay(10000) println("Hello world") } } } This gives you the following output: Async Async() executes the code inside its block asynchronously, and returns a result via Deferred, a non-blocking future that promises to provide a result later. You can get a Deferred’s result using the await() function, which allows you to suspend the execution of the coroutine until the asynchronous operation completes. Even if you call await() on the main UI thread, it won’t freeze or crash your app because only the coroutine is suspended, not the whole thread (we’ll be exploring this more in the following section). Once the asynchronous operation inside async() completes, the coroutine is resumed and can continue as normal. fun myAsyncCoroutine() { launch { //We’ll be looking at CommonPool later, so ignore this for now// val result = async(CommonPool) { //Do something asynchronous// }.await() myMethod(result) } } Here, myMethod(result) is executed with the result of the asynchronous operation (the result returned by the block of code inside async) without having to implement any callbacks. Replace thread blocking with coroutine suspension Many long-running operations, such as network I/O, require the caller to block until they complete. When a thread is blocked it’s unable to do anything else, which can make your app feel sluggish. At worst it may even result in your application throwing an Application Not Responding (ANR) error. Coroutines introduce suspension of a coroutine as an alternative to thread blocking. While a coroutine is suspended, the thread is free to continue doing other things. You could even suspend a coroutine on Android’s main UI thread without causing your UI to become unresponsive. The catch is that you can only suspend a coroutine’s execution at special suspension points, which occur when you invoke a suspending function. A suspending function can only be called from coroutines and other suspending functions — if you try to call one from your “regular” code, you’ll encounter a compilation error. Every coroutine must have at least one suspending function that you pass to the coroutine builder. For the sake of simplicity, throughout this article I’ll be using Delay() as our suspending function, which intentionally delays the program’s execution for the specified amount of time, without blocking the thread. Let’s look at an example of how you can use the Delay() suspending function to print “Hello world” in a slightly different way. In the following code we’re using Delay() to suspend the coroutine’s execution for two seconds, and then printing “World.” While the coroutine is suspended, the thread is free to continue executing the rest of our code. import android.support.v7.app.AppCompatActivity import android.os.Bundle import kotlinx.coroutines.experimental.delay import kotlinx.coroutines.experimental.launch class MainActivity : AppCompatActivity() { override fun onCreate(savedInstanceState: Bundle?) { super.onCreate(savedInstanceState) setContentView(R.layout.activity_main) launch { //Wait for 2 seconds/// delay(2000L) //After the delay, print the following// println("world") } //The thread continues while the coroutine is suspended// println("Hello") Thread.sleep(2000L) } } The end result, is an app that prints “Hello” to Android Studio’s Logcat, waits two seconds, and then prints “world.” In addition to Delay(), the kotlinx.coroutines library defines a number of suspending functions that you can use in your projects. Under the hood, a suspending function is simply a regular function that’s marked with the “suspend” modifier. In the following example, we’re creating a sayWorld suspending function: import android.support.v7.app.AppCompatActivity import android.os.Bundle import kotlinx.coroutines.experimental.launch class MainActivity : AppCompatActivity() { override fun onCreate(savedInstanceState: Bundle?) { super.onCreate(savedInstanceState) setContentView(R.layout.activity_main) launch { sayWorld() } println("Hello") } suspend fun sayWorld() { println("world!") } } Switching threads with coroutines Apps based on coroutines still use threads, so you’ll want to specify which thread a coroutine should use for its execution. You can restrict a coroutine to Android’s main UI thread, create a new thread, or dispatch a coroutine to a thread pool using coroutine context, a persistent set of objects you can attach to a coroutine. If you imagine coroutines as lightweight threads, then the coroutine context is like a collection of thread-local variables. All coroutine builders accept a CoroutineDispatcher parameter, which lets you control the thread a coroutine should use for its execution. You can pass any of the following CoroutineDispatcher implementations to a coroutine builder. CommonPool The CommonPool context confines the coroutine to a separate thread, which is taken from a pool of shared background threads. import android.support.v7.app.AppCompatActivity import android.os.Bundle import kotlinx.coroutines.experimental.CommonPool import kotlinx.coroutines.experimental.launch class MainActivity : AppCompatActivity() { override fun onCreate(savedInstanceState: Bundle?) { super.onCreate(savedInstanceState) setContentView(R.layout.activity_main) launch(CommonPool) { println("Hello from thread ${Thread.currentThread().name}") } } } Run this app on an Android Virtual Device (AVD) or physical Android smartphone or tablet. Then look at Android Studio’s Logcat and you should see the following message: I/System.out: Hello from thread ForkJoinPool.commonPool-worker-1 If you don’t specify a CoroutineDispatcher, the coroutine will use CommonPool by default. To see this in action, remove the CommonPool reference from your app: import android.support.v7.app.AppCompatActivity import android.os.Bundle import kotlinx.coroutines.experimental.launch class MainActivity : AppCompatActivity() { override fun onCreate(savedInstanceState: Bundle?) { super.onCreate(savedInstanceState) setContentView(R.layout.activity_main) launch { println("Hello from thread ${Thread.currentThread().name}") } } } Re-run this project, and Android Studio’s Logcat will display the exact same greeting: I/System.out: Hello from thread ForkJoinPool.commonPool-worker-1 Currently, if you want to execute a coroutine off the main thread you don’t have to specify the context, as coroutines run in CommonPool by default. There’s always a chance default behavior may change, so you should still be explicit about where you want a coroutine to run. newSingleThreadContext The newSingleThreadContext function creates a thread where the coroutine will run: import android.support.v7.app.AppCompatActivity import android.os.Bundle import kotlinx.coroutines.experimental.launch import kotlinx.coroutines.experimental.newSingleThreadContext class MainActivity : AppCompatActivity() { override fun onCreate(savedInstanceState: Bundle?) { super.onCreate(savedInstanceState) setContentView(R.layout.activity_main) launch(newSingleThreadContext("MyThread")) { println("Hello from thread ${Thread.currentThread().name}") } } } If you use newSingleThreadContext, make sure your app doesn’t consume unnecessary resources by releasing this thread as soon as it’s no longer needed. UI You can only access Android’s view hierarchy from the main UI thread. Coroutines run on CommonPool by default, but if you try to modify the UI from a coroutine running on one of these background threads, you’ll get a runtime error. To run code on the main thread, you need to pass the “UI’”object to the coroutine builder. In the following code, we’re performing some work on a separate thread using launch(CommonPool), and then calling launch() to trigger another coroutine, which will run on Android’s main UI thread. import android.support.v7.app.AppCompatActivity import android.os.Bundle import kotlinx.coroutines.experimental.CommonPool import kotlinx.coroutines.experimental.android.UI import kotlinx.coroutines.experimental.launch class MainActivity : AppCompatActivity() { override fun onCreate(savedInstanceState: Bundle?) { super.onCreate(savedInstanceState) setContentView(R.layout.activity_main) launch(CommonPool){ //Perform some work on a background thread// println("Hello from thread ${Thread.currentThread().name}") } //Switch to the main UI thread// launch(UI){ println("Hello from thread ${Thread.currentThread().name}") } } } Check Android Studio’s Logcat output, and you should see the following: Cancelling a coroutine Although coroutines have lots of positive to offer, memory leaks and crashes can still be a problem if you fail to stop long-running background tasks when the associated Activity or Fragment is stopped or destroyed. To cancel a coroutine, you need to call the cancel() method on the Job object returned from the coroutine builder (job.cancel). If you just want to cancel the acronymous operation inside a coroutine, you should call cancel() on the Deferred object instead. Wrapping up So that’s what you need to know to start using Kotlin’s coroutines in your Android projects. I showed you how to create a range of simple coroutines, specify the thread where each of these coroutines should execute, and how to suspend coroutines without blocking the thread. Do you think coroutines have the potential to make asynchronous programming in Android easier? Do you already have a tried-and-true method for giving your apps the ability to multi-task? Let us know in the comments below! , via Android Authority http://bit.ly/2rmD95g
0 notes
Text
JavaScript asynchrony and async/await in Selenium WebDriver Tests
Guest post by Gil Tayar, Senior Architect at Applitools
Selenium is a wonderful library. It supports all major browsers, has all the features we will probably need, and is currently the de-facto standard in browser tests today, and rightfully so.
(For those that don’t know, browser tests are tests that run a browser, automate the browser to interact with your frontend application, and test it that way.)
Selenium has bindings for lots of languages — Java, C#, Python, Ruby, and others. This is great — you can use your favorite language to write your tests in.
And if you’re a frontend developer, which language would you choose? Well, the language that you are probably most comfortable in: JavaScript. But JavaScript’s asynchronous nature poses special challenges for Selenium. In this post, I will discuss those challenges, and how JavaScript (and Selenium) overcome these challenges.
But first, I want to discuss Asynchrony in JavaScript in general.
Asynchrony in JavaScript
JavaScript is an asynchronous language. All I/O in it will (almost) always be asynchronous. Meaning that a callback will be needed to notify the program when the I/O operation is done. But this is not true in most other languages. In Java, for example, doing I/O is a synchronous operation. A file copy looks like this:
First, we read a file, then we copy it. Simple, no? But in JavaScript, it ain’t that simple:
Notice how there’s no code after the fs.readFile. The “real” code happens in the callback that is passed to fs.readFile. This is why callbacks in NodeJS are everywhere!
Why? Because JavaScript code has only one thread. If you block that thread, no other parallel code can run. This means you must never block your thread with I/O, which means that you need to supply a callback which will be called when that I/O operation finishes, and which has the code for the next part of your program.
Unfortunately this makes for some really ugly and obfuscated code. Imagine needing to loop over a set of files and copying them. With callbacks, you can’t use for-loops for that — you actually need some sort of recursion to do that. Yes, Asynchronous code is not just like synchronous code with callbacks — it’s a different way of writing code.
And it’s not pretty.
To compensate for this ugliness, ES2015 added Promise objects. Using promises, one can write callback code in a much nicer way:
This is much nicer, but is still a bit obfuscated. And it still has callbacks in it (the “then” handlers). Because, in the end, NodeJS has only one thread, and you’re not allowed to block it with I/O.
What if there was a way to tell JavaScript to wait on that promise, and then continue from that location once the promise resolves and has a value? Well, there is! It’s called async/await:
Yay! async/await handles all the ugly stuff and translates the above code to code that uses promises. We don’t care — it just works. It will never block on I/O. And we can use for-loops, and while loops, and break, and continue, and try/catch! As if we were programming in synchronous mode. Just don’t forget those await-s on functions that return a promise, or strange concurrent things start to happen.
Selenium WebDriver Code
Given all the above, imagine my surprise when I saw this Selenium WebDriver code:
This is, in JavaScript land, impossible code. Why? See the driver.get(…) line? That’s code that does I/O — it communicates via the network to another process. There is no possibility in NodeJS to run this code synchronously.
And yet, there is nary a promise, async/await, or callback in site! How does this work? Well, it turns out that it’s all a scam. You can find the sordid details here. But what is happening really is that when you call driver.get it doesn’t really navigate to the URL given, but rather just schedules it for later execution. And when the code calls driver.findElement, then it doesn’t really execute that, but rather schedules it for later, after the driver.get. It’s all scheduled to run asynchronously and not really executing synchronously.
This is wonderfully complex programming, and a technological feat in itself! But why did they do it? They did it to make testers that are used to Java/C#/Python synchronous programming, not be flummoxed by asynchronous programming. So they hacked it to make it look synchronous, but execute asynchronously.
But why do I call it a hack? Looks good, no? Well, no. Unfortunately, this abstraction leaks like hell. If you’re debugging the code, and reach the driver.get line, you expect it execute in the browser, but it doesn’t. And if you want to do an if based on the value of an element, then you can’t, because you don’t really have the value. It will get the value later.
Fortunately, they left a backdoor that allows us to work the “JavaScript” way. All the functions in Selenium WebDriver return a Promise, so the above could be written thus:
This is better, as now our code has control on when things happen, but it’s still Promise code — not the nicest way to write. But at least it’s not disguising itself as synchronous—it’s running asynchronously and things work as expected.
Fortunately, we now have async/await to help us. Let’s write the above code in async/await style:
That’s it — Selenium WebDriver code that looks synchronous code, but that uses Promises underneath, and has no hack code underneath that does crazy things.
The Future
It seems that the Selenium community understand that the scam that is this synchronous/asynchronous mode should be temporary:
The promise manager contained in this module is in the process of being phased out in favor of native JavaScript promises. This will be a long process and will not be completed until there have been two major LTS Node releases (approx. Node v10.0) that support async functions.
So start getting used to using async/await in your Selenium WebDriver tests—it’ll shortly be the only way in town. And that’s a good thing.
What Now?
Want to learn more about browser tests? You can learn more in previous psots of mine — here and here.
h2, h3, h4, h5 { font-weight: bold } figcaption { font-size: 10px; line-height: 1.4; color: grey; letter-spacing: 0; position: relative; left: 0; width: 100%; top: 0; margin-bottom: 15px; text-align: center; z-index: 300; } figure img { margin: 0; }

About the Author: 30 years of experience have not dulled the fascination Gil Tayar has with software development. From the olden days of DOS, to the contemporary world of Software Testing, Gil was, is, and always will be, a software developer. He has in the past co-founded WebCollage, survived the bubble collapse of 2000, and worked on various big cloudy projects at Wix. His current passion is figuring out how to test software, a passion which he has turned into his main job as Evangelist and Senior Architect at Applitools. He has religiously tested all his software, from the early days as a junior software developer to the current days at Applitools, where he develops tests for software that tests software, which is almost one meta layer too many for him. In his private life, he is a dad to two lovely kids (and a cat), an avid reader of Science Fiction, (he counts Samuel Delany, Robert Silverberg, and Robert Heinlein as favorites) and a passionate film buff. (Stanley Kubrick, Lars Von Trier, David Cronenberg, anybody?) Unfortunately for him, he hasn’t really answered the big question of his life - he still doesn't know whether static languages or dynamic languages are best.
0 notes
Text
In our previous blog, we tried to explore the upcoming version of i.e Java 9. So this time we try to focus on Scala . In This Blog , We will be Looking onto a New Reactive programming framework for Scala Applications i.e Reactors IO .
Reactors.io fuses the Best parts of Functional reactive Programming and the Actor Model. Reactors allows you to create concurrent and distributed applications more easily, by providing correct, robust and composable programming abstractions.Primarily targeting on JVM , the Reactors framework has bindings for both Scala and Java.
Setting Up Reactors.io
To get started with Reactors.IO, you should grab the latest snapshot version distributed on Maven. If you are using SBT, add the following to your project definition :
Then Simply Import the io.reactors package: import io.reactors._ and you are ready to go.
Why Reactors?
Areas Where Actors Lack :
First, in the basic actor model, actors cannot simultaneously contain multiple message entry points
Second , actors cannot await specific combinations of messages
Third, receive is not a first class entity. Instead of a value that can be passed to and returned from functions, receive is a static construct.
These limitations make Protocol Composition within a single actor cumbersome, convolute abstractions and restrict code reuse.The model is sufficiently low-level to express arbitrary message protocols. Composing these protocols is the key to high-level abstractions. Therefore, it is difficult to reuse or compose message protocols with actors. Reactors simplify protocol composition with first-class typed channels and event streams.
Reactor Characteristics
Event Driven:
Reactors comprise an event-driven programming model. Clients can subscribe and react to event streams, which asynchronously produce events. This makes the reactor model well-suited for interactive applications , but also ideal for building distributed software, which is typically characterized by latency and asynchrony. After an event arrives, it gets forwarded to the observers of that event stream.
Concurrent and distributed :
The reactor model organizes computations into basic units of concurrency called reactors. Inside each reactor, computation is sequential. At the same time, the reactor model is quite location-transparent. This means that you can develop and test the program on a single machine, and then seamlessly deploy it on multiple machine that are connected with a computer network.
First class :
While the concept of event streams and callbacks resembles the principles found in traditional actor systems , event streams are first-class, functional values. They can be declaratively composed and manipulated in a similar fashion as Scala collections or Java streams.First-class events streams and signals allow a better separation of concerns.
Modular :
Components are expressed as event stream operations, which can be packaged into modules, and later reused or further composed.The subtle interplay between channels and event streams allows composing powerful event exchange protocols in a modular fashion.
Actors vs Reactors
Actors
Reactors
Actors receive messages Reactors receive events An actor in particular state has only a single point in its definition where it can receive a message. A reactor can receive an event from many different sources at any time. Receive all types of messages Receive events only of Defined(T) Type in Reactor.apply[T] (Eg. String) It difficult to reuse or compose message protocols with actors. Comparatively , Protocol composition is much simpler in case of reactors.
Reactor System Basics
Event streams :
Event streams are objects that may asynchronously publish events. Event streams are entities that propagate events within a reactor, and they cannot be shared between reactors. An event stream is associated to every channel. Event streams can be used as we use collections in Scala.
Channels :
Reactor’s means of communicating with its environment. Every reactor is created with a default channel called main, which is usually sufficient. Every channel is owned by a single reactor. Any reactor can send an event to a channel, but only the channel owner can process that event.
Schedulers :
Schedulers in Reactor Model basically help in assigning a thread to the events so that they can be executed i.e. helps in Resource Management. Every reactor system is bundled with a Default scheduler and some additional predefined schedulers. When a reactor is started, it uses the default scheduler, unless specified otherwise.
Reactor LifeCycle
Every reactor goes through a certain set of stages during its lifetime, jointly called a Reactor Lifecycle. When the reactor enters a specific stage, it emits a lifecycle event. All lifecycle events are dispatched on a special daemon event stream called sysEvents. Every reactor is created with this event stream.
Reactor System Services
The Logging service :
The Logging service is used to print logging messages to the standard output
The Channels service :
The Channels service provides an event-driven view over all channels that exist in the current reactor system.This allows polling the channels that are currently available, or waiting until a channel with a specific name becomes available.
The Clock Service :
The Clock service is capable of producing time-driven events, for example,timeouts, countdowns or periodic counting.The Clock service uses a separate timer thread under the-hood, which sends events to the reactor when the timer thread decides it is time to do so.
Protocols
Set of Predefined Rules Provided by the Reactor System in order to ease the understandings and also to maintain certain standards for successfully creating concurrent and distributed applications. The communication protocols are composed from basic abstractions and simpler protocols.
There are various protocols provided by the Reactor Model .
The Basic Among Them Include :
Standard server-client protocol :
The Standard Server- Client Protocol relies solely on the basic primitives provided by the Reactors framework. This Protocol is the Basis for other Protocols and it can also be modified or customized easily according to our requirements thus turning into a Custom Client-Server Protocol
Router Protocol :
Events coming to a specific channel are routed between a set of target channels, according to some user-specified policy.(Round-Robin , Hash , Random) Applications :
Data replication and sharding
Load-balancing
Multcasting
2-Way Communication Protocol
In two-way communication, two parties obtain a link handle of type TwoWay, which allows them to simultaneously send and receive an unlimited number of events, until they decide to close this link. The TwoWay object contains an output channel Output, and an input event stream Input. To close the link, the TwoWay object contains a subscription object called Subscription, which is used to close the link and free the associated resources.
Limitations : Not Everything is Perfect
Reactors may overcome many problems of the traditional actor system but still lack certain things. One of the major among them is :
– Missing Resilience ( The ability to overcome from a crash or problem) i.e No supervision as provided by Akka. – Still under development and many features are still missing and hopefully will be updated soon.
References :
Reactors.io
Reactors, Channels, and Event Streams for Composable Distributed Programming (PDF) – By Martin Odersky and Aleksandar Prokopec
This is all for Reactors for now. For more You can refer to the Official Reactors io Site : Reactors.io
And also for the Code Reference You can find all the related code snippets on the following github link : https://github.com/anmol2709/Reactor-POC
Hope This blog helps. Stay Tuned for More 🙂
Reactors.IO: Actors Done Right In our previous blog, we tried to explore the upcoming version of i.e Java 9. So this time we try to focus on Scala .
0 notes
Text
93% off #Angular 2 with TypeScript for Beginners: The Pragmatic Guide �� $10
Learn to build real-world apps with Angular2 with confidence
All Levels, – 9 hours, 184 lectures
Average rating 4.5/5 (4.5 (4,504 ratings) Instead of using a simple lifetime average, Udemy calculates a course’s star rating by considering a number of different factors such as the number of ratings, the age of ratings, and the likelihood of fraudulent ratings.)
Course requirements:
Minimum 3 months experience developing web applications (familiarity with HTML, CSS, Javascript, APIs) Basic familiarity with the concept of object-oriented languages (eg. classes, properties, methods, constructors) is required Familiarity with Bootstrap is a bonus
Course description:
UPDATE (8 Nov 2016): Course is updated to Angular 2 final release.
Angular 2 is the next big thing. It’s one of the leading frameworks for building modern, scalable, cross-platform apps. If you want to establish yourself as a front-end or a full-stack developer, you need to learn Angular 2.
In Angular 2 with TypeScript, Mosh, author of six 5-star Udemy courses, takes you on a fun, hands-on and pragmatic journey to master Angular 2.
More specifically, you’ll learn how to:
Build re-usable components Control rendering of HTML Format data using pipes Implement custom pipes Build forms with custom validation Use Reactive Extensions and Observables to handle asynchrony Consume back-end services and APIs Build single page apps (SPA) Use dependency injection to write loosely-coupled, testable code Resolve common Angular 2 errors Write cleaner, more maintainable code And much more…
If you’ve taken any of Mosh’s courses before, you know what you get. He is very passionate, clear and concise in his teaching. Every section and every lecture has been perfectly thought through to lead you on a step-by-step journey from zero to hero with no fluff whatsoever. If you’re looking for 10+ hours of wasted time on the content you don’t need and a rambling instructor, there are other courses you can enrol in.
You’ll start building Angular 2 apps within minutes. Every section includes a few bite-sized videos, and concludes with a coding exercise to help you master what you learn in that section. The last two sections are purely coding exercises.
At the end of this course, you’ll build an application that exhibits many features you find in a lot of real-world applications, including but not limited to:
CRUD operations against a backend API Form with custom validation Dirty tracking Master / detail views Loading content dynamically Showing spinner icons while content is loading Filtering Paging More…
Reviewed by Todd Motto (Google Developer Expert):
Mosh has a fantastic teaching style, and just delivered the best online course I’ve seen in a long time. Mosh’s approach to teaching and guiding makes no assumptions on existing Angular 1.x knowledge, but helps those who have to clarify new concepts. Mosh guides you through critical concepts slowly without skipping over details, and the course is extremely worth investing a few hours in, your understanding of Angular 2 will reach new levels. He fills all the gaps, presents impeccably well and the preparation was top notch, seriously can’t recommend the course enough.
What others who have taken this course say:
“Great course, even for seasoned developers. I’m a ReactJs developer using this to broaden my horizons!” -Tyler Markvluwer
“Mosh is a great instructor, he is very clear and concise and breaks down his examples into small “components” (drum roll please). Having never used Angular before, I’m really impressed at how easy it was to understand the concepts and even managed most of the examples without having to refer back to the lectures and that is in no small part due to Mosh’s understanding of Angular and how well he explains everything. If you can’t already tell, I’m really impressed Mosh” -Chris Graham
“It’s the best angular2 video that i ever seen. It’s all well explained and easy to understand. It’s not need have angular1 knowledge. I’m happy because i’ve grown as a developer. Thanks” -Miguelangel Cabrera
“Very good step by step explainations. Focus on “why”, then “how” instead of “type after me”. Love it!” -Krysztof Gurniak
“As the absolute Angular newbie I was, I can recommend this course 100%.” -Guillermo Aguyanes
“Mosh does a great job at explaining templates, directives, dependency injections and everything else. 10/10 would take his course again.” -Rob
So, if you’re looking for an Angular 2 course with
A passionate coder and instructor who knows his craft Perfect structure Balanced mix of theory and practi
Reviews:
“Great presentation and contents well prepared, however it would be good to have videos entirely updated to the recent state of the presented subject… anyway, this shortcoming has also its pros… as that makes student actively referring to official documentation and make him used to do so” (Russlan Kafri)
“Before explaining my rating of this course, I would like to say the follow: I respect Mosh Hamadani in every aspect. I consider him my mentor. The Angular 2 course is extremely well thought out and delivered by Mosh. Having said this, however, the course should have been redone at any cost to the “Final” version of Angular. Although Mosh stated that the changes from the Beta version to the Final version should be easy to follow, I really found trying to understand Mosh’s code, which uses the Beta version, and my implementing this same code in the Final version of Angular to be super tough, confusing, and very time consuming on this end. My conclusion then is the following: this is really a 5 star course, and Mosh Hamadani is a 6 star instructor, but the fact that the course uses the Beta version of Angular instead of the Final version of Angular makes me rate it as a 3, not a 5. My apologies to Mosh in advance, because he has in fact done me a great service by creating this course, but I do feel I need to tell others my experience.” (David Meysman)
“Thanks a lot for this course, I want to introduce it to my classmates and build school projects with it. Really well structured course! Even-though the older beta version! Definitely 5 out of 5” (Ferry Jongmans)
About Instructor:
Mosh Hamedani
Moshfegh Hamedani is a passionate and creative software engineer with a strong focus on pragmatism and simplicity. He started programming at the age of seven on a Commodore 64. Later, during his high school years, he started learning C and C++ . In 2002, along with the first release of .NET, he shifted his focus to C#. Since then he has been involved in the design and implementation of numerous software projects, including modern web applications, mobile apps, desktop applications and frameworks. Aside from his career as a software engineer, he truly enjoys sharing his knowledge with others. Since his early twenties, he has been teaching courses and running workshops on C#, ASP. NET, object-oriented programming and clean coding. He is author of 6 best-selling courses on Udemy and more will be coming soon. Mosh has a Master of Science in Network Systems and a Bachelor of Science in Software Engineering. He is also a Microsoft Certified Application Developer, Technology Specialist (Web Applications) and Professional. Outside the software world, Mosh is a photographer, a pianist and a passionate Latin dancer.
Instructor Other Courses:
Build Enterprise Applications with Angular 2 Mosh Hamedani, Passionate Software Engineer and Best-selling Author (96) $10 $80 Xamarin Forms: Build Native Cross-platform Apps with C# The Complete ASP.NET MVC 5 Course …………………………………………………………… Mosh Hamedani coupons Development course coupon Udemy Development course coupon Web Development course coupon Udemy Web Development course coupon Angular 2 with TypeScript for Beginners: The Pragmatic Guide Angular 2 with TypeScript for Beginners: The Pragmatic Guide course coupon Angular 2 with TypeScript for Beginners: The Pragmatic Guide coupon coupons
The post 93% off #Angular 2 with TypeScript for Beginners: The Pragmatic Guide – $10 appeared first on Udemy Cupón/ Udemy Coupon/.
from Udemy Cupón/ Udemy Coupon/ http://coursetag.com/udemy/coupon/93-off-angular-2-with-typescript-for-beginners-the-pragmatic-guide-10/ from Course Tag https://coursetagcom.tumblr.com/post/155305640358
0 notes
Text
March 10, 2020 at 10:00PM - The Ultimate Learn to Code 2017 Bundle (95% discount) Ashraf
The Ultimate Learn to Code 2017 Bundle (95% discount) Hurry Offer Only Last For HoursSometime. Don't ever forget to share this post on Your Social media to be the first to tell your firends. This is not a fake stuff its real.
Ruby on Rails is one of the most popular web applications development frameworks, and one that is hugely valuable for aspiring developers to learn. This course is designed for students of all levels and backgrounds, giving you an in-depth tutorial on Ruby on Rails, and specifically Rails 5, the newest release. You’ll come to grips with some of the newest features, including building real-time apps, and master some basic and more advanced development techniques.
Access 174 lectures & 20 hours of content 24/7
Learn how to build web apps using Ruby on Rails & become proficient in back-end development
Build automated test suites for complex web apps
Become a confident web app developer
Compete for the highest paying junior developer jobs
Work w/ real-time features thanks to the introduction of ActionCable in Rails 5
If you’re interested in pursuing a career in web development, then it is imperative that you become proficient in JavaScript. Almost every digital development project involves some level of JavaScript, and experts are perpetually in demand. Whether you’re a business owner, a freelancer, or seek to work in the web dev industry, this comprehensive course will get you started on the right path. Once you complete the course, you’ll be eligible to sit for the JavaScript Specialist Designation exam, and be armed with all the knowledge you need to receive a passing grade.
Access 96 lectures & 8.5 hours of content 24/7
Learn how to output to the console & to the browser window by manipulating the DOM
Understand how to use variables, perform arithmetic, use operators, numbers, & Booleans, & much more w/ JavaScript
Code for JavaScript events & callback functions
Create arrays, strings, string functions, & more
Process text w/ JavaScript regular expressions
Access web services w/ the xmlHTTPRequest() Object
Discover JSON notation & parsing JSON content
Few programming languages provide you with the flexibility and pure power of Python, which is why many professionals recommend that beginner programmers learn Python first. Due to its relatively simply syntax and extensive degree of general-purpose use, it just makes sense to know. Python is commonly used for server side programming for complex web apps or as a middle tier language providing web services or a communication layer with larger ecommerce systems. All that is to say you can do a lot with Python, and this course will show you just how much.
Access 76 lectures & 5.5 hours of content 24/7
Explore some of Python’s many libraries for everything from games & graphics to complex mathematics
Study & modify code on your own to cement each topic
Familiarize yourself w/ Python syntax & real problem solving w/ Python
Complete a comprehensive project that integrates a number of different skills that are a part of core Python
Java is the most in-demand and highest paying programming language on earth, and regardless of your coding experience, you can become an expert with it in this course. From absolute basics to advanced concepts, this course takes you through descriptions of what Java can do, and teaches you how to make it work for you.
Access 62 lectures & 9 hours of content 24/7
Create a project, compile, & execute your first Java program
Learn useful shortcuts that will cut down on your programming time
Understand variables, operators, conditions, arrays, loops, & more
Take a deep dive into Object Oriented Programming
Discuss Lambda Expressions & generic types
HTML and CSS are two of the most essential programming languages for website design, allowing users to interact with site pages seamlessly and productively. In this example-driven course, you’ll learn how to create responsive websites that clients and users will love. Whether you’re aspiring to be a professional web designer or you just want to spruce up your blog, this course is an excellent introduction.
Access 57 lectures & 4.5 hours of content 24/7
Get an introduction to the basics of HTML5 & CSS3
Learn new multimedia updates in the newest versions of HTML & CSS
Work w/ HTML5 new forms elements & the canvas tag
Build a complete, professional looking webpage using HTML5 & CSS3 techniques
Start building Angular 2 apps within minutes of this comprehensive, 7 hour course. You’ll learn this exciting new framework with hands-on lessons, and by building actual, real-world applications. Approved by Google Developer Expert, Todd Motto, this is the one-stop shop to master Angular 2.
Access 156 lectures & 7 hours of content 24/7
Master the core Angular 2 concepts & how to use them in building real-world apps
Understand & resolve common Angular 2 errors
Build single page applications (SPA)
Learn ways to write cleaner, more maintainable code, & build reusable components
Use Reactive Extensions & Observables to handle asynchrony
Connect to backend services & APIs
You don’t need to learn both Java and Swift to build apps for Android and iOS. With Xamarin, you can use the C# programming language to build fully-functional apps for iOS and Android at the same time. Because Xamarin developers can stream the app-building process so much, companies are demanding them in a big way. This is the perfect beginner course to put you on the path to making big money in Xamarin development.
Access 48 lectures & 5.5 hours of content 24/7
Learn how to install Xamarin for free
Explore basic C# programming
Create basic apps w/ code sharing tasks, hints & tips
Build complex apps like a magnet detector & music player
You do a lot with your iPhone apps, but wouldn’t it be cool to build your own apps, as well? The best way to learn is by doing and this course will throw you into the fire, teaching you how to create your own iOS 10 apps in Xcode 8 and Objective-C, from concept to submission to the App Store. You’ll utilize brand new features as well as cross-platform standards as you iron down the basics of mobile app development and start working towards new career possibilities.
Access 104 lectures & 7.5 hours of content 24/7
Understand Xcode 8, iOS 10, Interface Builder, Simulator, & project types
Get a full guide to creating full featured apps in Objective-C
Create over 20 real iOS 10 apps in both Xcode 8 & Objective-C
Discover how to build for universal device & screen size support
Earn ad revenue & incorporate in-app purchases to get paid on your apps
Learn Core Data & camera support applications
SQL is the most popular database programming language in the world today, and has been for many years. In this course, you’ll learn the fundamentals of writing SQL to perform a variety of data manipulations. Considering it’s used by many, many Fortune 500 companies and startups of all sizes across the globe, learning SQL is a major boost to your resume.
Access 35 lectures & 4 hours of content 24/7
Get a firm grasp of SQL programming fundamentals
Learn about ASP.NET, IIS, & Visual Studio
Create & change tables using SQL
Make SQL Server work w/ ASP.NET
Join tables seamlessly
When it comes to web programming, there are a lot of tools you can learn and use to make your workflow more efficient and your products more exciting. Getting started can be daunting when you know just how much there is to learn. However, the barriers to learning are lower than ever, and this immersive course will give you a crash course into a variety of languages and tools, plus how to integrate them, giving you an excellent foundation for further learning.
Access 67 lectures & 10.5 hours of content 24/7
Add dynamic features to a website using JavaScript & jQuery
Transfer information between web pages using JSON
Layout websites more efficiently w/ CSS & HTML
Power the back-end of a website w/ C#
Work w/ data more efficiently using SQL Lite
from Active Sales – SharewareOnSale https://ift.tt/2vzgc4O https://ift.tt/eA8V8J via Blogger https://ift.tt/2vgtR0W #blogger #bloggingtips #bloggerlife #bloggersgetsocial #ontheblog #writersofinstagram #writingprompt #instapoetry #writerscommunity #writersofig #writersblock #writerlife #writtenword #instawriters #spilledink #wordgasm #creativewriting #poetsofinstagram #blackoutpoetry #poetsofig
0 notes
Text
February 15, 2020 at 10:00PM - The Ultimate Learn to Code 2017 Bundle (95% discount) Ashraf
The Ultimate Learn to Code 2017 Bundle (95% discount) Hurry Offer Only Last For HoursSometime. Don't ever forget to share this post on Your Social media to be the first to tell your firends. This is not a fake stuff its real.
Ruby on Rails is one of the most popular web applications development frameworks, and one that is hugely valuable for aspiring developers to learn. This course is designed for students of all levels and backgrounds, giving you an in-depth tutorial on Ruby on Rails, and specifically Rails 5, the newest release. You’ll come to grips with some of the newest features, including building real-time apps, and master some basic and more advanced development techniques.
Access 174 lectures & 20 hours of content 24/7
Learn how to build web apps using Ruby on Rails & become proficient in back-end development
Build automated test suites for complex web apps
Become a confident web app developer
Compete for the highest paying junior developer jobs
Work w/ real-time features thanks to the introduction of ActionCable in Rails 5
If you’re interested in pursuing a career in web development, then it is imperative that you become proficient in JavaScript. Almost every digital development project involves some level of JavaScript, and experts are perpetually in demand. Whether you’re a business owner, a freelancer, or seek to work in the web dev industry, this comprehensive course will get you started on the right path. Once you complete the course, you’ll be eligible to sit for the JavaScript Specialist Designation exam, and be armed with all the knowledge you need to receive a passing grade.
Access 96 lectures & 8.5 hours of content 24/7
Learn how to output to the console & to the browser window by manipulating the DOM
Understand how to use variables, perform arithmetic, use operators, numbers, & Booleans, & much more w/ JavaScript
Code for JavaScript events & callback functions
Create arrays, strings, string functions, & more
Process text w/ JavaScript regular expressions
Access web services w/ the xmlHTTPRequest() Object
Discover JSON notation & parsing JSON content
Few programming languages provide you with the flexibility and pure power of Python, which is why many professionals recommend that beginner programmers learn Python first. Due to its relatively simply syntax and extensive degree of general-purpose use, it just makes sense to know. Python is commonly used for server side programming for complex web apps or as a middle tier language providing web services or a communication layer with larger ecommerce systems. All that is to say you can do a lot with Python, and this course will show you just how much.
Access 76 lectures & 5.5 hours of content 24/7
Explore some of Python’s many libraries for everything from games & graphics to complex mathematics
Study & modify code on your own to cement each topic
Familiarize yourself w/ Python syntax & real problem solving w/ Python
Complete a comprehensive project that integrates a number of different skills that are a part of core Python
Java is the most in-demand and highest paying programming language on earth, and regardless of your coding experience, you can become an expert with it in this course. From absolute basics to advanced concepts, this course takes you through descriptions of what Java can do, and teaches you how to make it work for you.
Access 62 lectures & 9 hours of content 24/7
Create a project, compile, & execute your first Java program
Learn useful shortcuts that will cut down on your programming time
Understand variables, operators, conditions, arrays, loops, & more
Take a deep dive into Object Oriented Programming
Discuss Lambda Expressions & generic types
HTML and CSS are two of the most essential programming languages for website design, allowing users to interact with site pages seamlessly and productively. In this example-driven course, you’ll learn how to create responsive websites that clients and users will love. Whether you’re aspiring to be a professional web designer or you just want to spruce up your blog, this course is an excellent introduction.
Access 57 lectures & 4.5 hours of content 24/7
Get an introduction to the basics of HTML5 & CSS3
Learn new multimedia updates in the newest versions of HTML & CSS
Work w/ HTML5 new forms elements & the canvas tag
Build a complete, professional looking webpage using HTML5 & CSS3 techniques
Start building Angular 2 apps within minutes of this comprehensive, 7 hour course. You’ll learn this exciting new framework with hands-on lessons, and by building actual, real-world applications. Approved by Google Developer Expert, Todd Motto, this is the one-stop shop to master Angular 2.
Access 156 lectures & 7 hours of content 24/7
Master the core Angular 2 concepts & how to use them in building real-world apps
Understand & resolve common Angular 2 errors
Build single page applications (SPA)
Learn ways to write cleaner, more maintainable code, & build reusable components
Use Reactive Extensions & Observables to handle asynchrony
Connect to backend services & APIs
You don’t need to learn both Java and Swift to build apps for Android and iOS. With Xamarin, you can use the C# programming language to build fully-functional apps for iOS and Android at the same time. Because Xamarin developers can stream the app-building process so much, companies are demanding them in a big way. This is the perfect beginner course to put you on the path to making big money in Xamarin development.
Access 48 lectures & 5.5 hours of content 24/7
Learn how to install Xamarin for free
Explore basic C# programming
Create basic apps w/ code sharing tasks, hints & tips
Build complex apps like a magnet detector & music player
You do a lot with your iPhone apps, but wouldn’t it be cool to build your own apps, as well? The best way to learn is by doing and this course will throw you into the fire, teaching you how to create your own iOS 10 apps in Xcode 8 and Objective-C, from concept to submission to the App Store. You’ll utilize brand new features as well as cross-platform standards as you iron down the basics of mobile app development and start working towards new career possibilities.
Access 104 lectures & 7.5 hours of content 24/7
Understand Xcode 8, iOS 10, Interface Builder, Simulator, & project types
Get a full guide to creating full featured apps in Objective-C
Create over 20 real iOS 10 apps in both Xcode 8 & Objective-C
Discover how to build for universal device & screen size support
Earn ad revenue & incorporate in-app purchases to get paid on your apps
Learn Core Data & camera support applications
SQL is the most popular database programming language in the world today, and has been for many years. In this course, you’ll learn the fundamentals of writing SQL to perform a variety of data manipulations. Considering it’s used by many, many Fortune 500 companies and startups of all sizes across the globe, learning SQL is a major boost to your resume.
Access 35 lectures & 4 hours of content 24/7
Get a firm grasp of SQL programming fundamentals
Learn about ASP.NET, IIS, & Visual Studio
Create & change tables using SQL
Make SQL Server work w/ ASP.NET
Join tables seamlessly
When it comes to web programming, there are a lot of tools you can learn and use to make your workflow more efficient and your products more exciting. Getting started can be daunting when you know just how much there is to learn. However, the barriers to learning are lower than ever, and this immersive course will give you a crash course into a variety of languages and tools, plus how to integrate them, giving you an excellent foundation for further learning.
Access 67 lectures & 10.5 hours of content 24/7
Add dynamic features to a website using JavaScript & jQuery
Transfer information between web pages using JSON
Layout websites more efficiently w/ CSS & HTML
Power the back-end of a website w/ C#
Work w/ data more efficiently using SQL Lite
from Active Sales – SharewareOnSale https://ift.tt/2vzgc4O https://ift.tt/eA8V8J via Blogger https://ift.tt/2UUk4I9 #blogger #bloggingtips #bloggerlife #bloggersgetsocial #ontheblog #writersofinstagram #writingprompt #instapoetry #writerscommunity #writersofig #writersblock #writerlife #writtenword #instawriters #spilledink #wordgasm #creativewriting #poetsofinstagram #blackoutpoetry #poetsofig
0 notes
Text
January 03, 2020 at 10:00PM - The Ultimate Learn to Code 2017 Bundle (95% discount) Ashraf
The Ultimate Learn to Code 2017 Bundle (95% discount) Hurry Offer Only Last For HoursSometime. Don't ever forget to share this post on Your Social media to be the first to tell your firends. This is not a fake stuff its real.
Ruby on Rails is one of the most popular web applications development frameworks, and one that is hugely valuable for aspiring developers to learn. This course is designed for students of all levels and backgrounds, giving you an in-depth tutorial on Ruby on Rails, and specifically Rails 5, the newest release. You’ll come to grips with some of the newest features, including building real-time apps, and master some basic and more advanced development techniques.
Access 174 lectures & 20 hours of content 24/7
Learn how to build web apps using Ruby on Rails & become proficient in back-end development
Build automated test suites for complex web apps
Become a confident web app developer
Compete for the highest paying junior developer jobs
Work w/ real-time features thanks to the introduction of ActionCable in Rails 5
If you’re interested in pursuing a career in web development, then it is imperative that you become proficient in JavaScript. Almost every digital development project involves some level of JavaScript, and experts are perpetually in demand. Whether you’re a business owner, a freelancer, or seek to work in the web dev industry, this comprehensive course will get you started on the right path. Once you complete the course, you’ll be eligible to sit for the JavaScript Specialist Designation exam, and be armed with all the knowledge you need to receive a passing grade.
Access 96 lectures & 8.5 hours of content 24/7
Learn how to output to the console & to the browser window by manipulating the DOM
Understand how to use variables, perform arithmetic, use operators, numbers, & Booleans, & much more w/ JavaScript
Code for JavaScript events & callback functions
Create arrays, strings, string functions, & more
Process text w/ JavaScript regular expressions
Access web services w/ the xmlHTTPRequest() Object
Discover JSON notation & parsing JSON content
Few programming languages provide you with the flexibility and pure power of Python, which is why many professionals recommend that beginner programmers learn Python first. Due to its relatively simply syntax and extensive degree of general-purpose use, it just makes sense to know. Python is commonly used for server side programming for complex web apps or as a middle tier language providing web services or a communication layer with larger ecommerce systems. All that is to say you can do a lot with Python, and this course will show you just how much.
Access 76 lectures & 5.5 hours of content 24/7
Explore some of Python’s many libraries for everything from games & graphics to complex mathematics
Study & modify code on your own to cement each topic
Familiarize yourself w/ Python syntax & real problem solving w/ Python
Complete a comprehensive project that integrates a number of different skills that are a part of core Python
Java is the most in-demand and highest paying programming language on earth, and regardless of your coding experience, you can become an expert with it in this course. From absolute basics to advanced concepts, this course takes you through descriptions of what Java can do, and teaches you how to make it work for you.
Access 62 lectures & 9 hours of content 24/7
Create a project, compile, & execute your first Java program
Learn useful shortcuts that will cut down on your programming time
Understand variables, operators, conditions, arrays, loops, & more
Take a deep dive into Object Oriented Programming
Discuss Lambda Expressions & generic types
HTML and CSS are two of the most essential programming languages for website design, allowing users to interact with site pages seamlessly and productively. In this example-driven course, you’ll learn how to create responsive websites that clients and users will love. Whether you’re aspiring to be a professional web designer or you just want to spruce up your blog, this course is an excellent introduction.
Access 57 lectures & 4.5 hours of content 24/7
Get an introduction to the basics of HTML5 & CSS3
Learn new multimedia updates in the newest versions of HTML & CSS
Work w/ HTML5 new forms elements & the canvas tag
Build a complete, professional looking webpage using HTML5 & CSS3 techniques
Start building Angular 2 apps within minutes of this comprehensive, 7 hour course. You’ll learn this exciting new framework with hands-on lessons, and by building actual, real-world applications. Approved by Google Developer Expert, Todd Motto, this is the one-stop shop to master Angular 2.
Access 156 lectures & 7 hours of content 24/7
Master the core Angular 2 concepts & how to use them in building real-world apps
Understand & resolve common Angular 2 errors
Build single page applications (SPA)
Learn ways to write cleaner, more maintainable code, & build reusable components
Use Reactive Extensions & Observables to handle asynchrony
Connect to backend services & APIs
You don’t need to learn both Java and Swift to build apps for Android and iOS. With Xamarin, you can use the C# programming language to build fully-functional apps for iOS and Android at the same time. Because Xamarin developers can stream the app-building process so much, companies are demanding them in a big way. This is the perfect beginner course to put you on the path to making big money in Xamarin development.
Access 48 lectures & 5.5 hours of content 24/7
Learn how to install Xamarin for free
Explore basic C# programming
Create basic apps w/ code sharing tasks, hints & tips
Build complex apps like a magnet detector & music player
You do a lot with your iPhone apps, but wouldn’t it be cool to build your own apps, as well? The best way to learn is by doing and this course will throw you into the fire, teaching you how to create your own iOS 10 apps in Xcode 8 and Objective-C, from concept to submission to the App Store. You’ll utilize brand new features as well as cross-platform standards as you iron down the basics of mobile app development and start working towards new career possibilities.
Access 104 lectures & 7.5 hours of content 24/7
Understand Xcode 8, iOS 10, Interface Builder, Simulator, & project types
Get a full guide to creating full featured apps in Objective-C
Create over 20 real iOS 10 apps in both Xcode 8 & Objective-C
Discover how to build for universal device & screen size support
Earn ad revenue & incorporate in-app purchases to get paid on your apps
Learn Core Data & camera support applications
SQL is the most popular database programming language in the world today, and has been for many years. In this course, you’ll learn the fundamentals of writing SQL to perform a variety of data manipulations. Considering it’s used by many, many Fortune 500 companies and startups of all sizes across the globe, learning SQL is a major boost to your resume.
Access 35 lectures & 4 hours of content 24/7
Get a firm grasp of SQL programming fundamentals
Learn about ASP.NET, IIS, & Visual Studio
Create & change tables using SQL
Make SQL Server work w/ ASP.NET
Join tables seamlessly
When it comes to web programming, there are a lot of tools you can learn and use to make your workflow more efficient and your products more exciting. Getting started can be daunting when you know just how much there is to learn. However, the barriers to learning are lower than ever, and this immersive course will give you a crash course into a variety of languages and tools, plus how to integrate them, giving you an excellent foundation for further learning.
Access 67 lectures & 10.5 hours of content 24/7
Add dynamic features to a website using JavaScript & jQuery
Transfer information between web pages using JSON
Layout websites more efficiently w/ CSS & HTML
Power the back-end of a website w/ C#
Work w/ data more efficiently using SQL Lite
from Active Sales – SharewareOnSale https://ift.tt/2q0Kp8o https://ift.tt/eA8V8J via Blogger https://ift.tt/2rTdhCt #blogger #bloggingtips #bloggerlife #bloggersgetsocial #ontheblog #writersofinstagram #writingprompt #instapoetry #writerscommunity #writersofig #writersblock #writerlife #writtenword #instawriters #spilledink #wordgasm #creativewriting #poetsofinstagram #blackoutpoetry #poetsofig
0 notes
Text
December 13, 2019 at 10:00PM - The Ultimate Learn to Code 2017 Bundle (95% discount) Ashraf
The Ultimate Learn to Code 2017 Bundle (95% discount) Hurry Offer Only Last For HoursSometime. Don't ever forget to share this post on Your Social media to be the first to tell your firends. This is not a fake stuff its real.
Ruby on Rails is one of the most popular web applications development frameworks, and one that is hugely valuable for aspiring developers to learn. This course is designed for students of all levels and backgrounds, giving you an in-depth tutorial on Ruby on Rails, and specifically Rails 5, the newest release. You’ll come to grips with some of the newest features, including building real-time apps, and master some basic and more advanced development techniques.
Access 174 lectures & 20 hours of content 24/7
Learn how to build web apps using Ruby on Rails & become proficient in back-end development
Build automated test suites for complex web apps
Become a confident web app developer
Compete for the highest paying junior developer jobs
Work w/ real-time features thanks to the introduction of ActionCable in Rails 5
If you’re interested in pursuing a career in web development, then it is imperative that you become proficient in JavaScript. Almost every digital development project involves some level of JavaScript, and experts are perpetually in demand. Whether you’re a business owner, a freelancer, or seek to work in the web dev industry, this comprehensive course will get you started on the right path. Once you complete the course, you’ll be eligible to sit for the JavaScript Specialist Designation exam, and be armed with all the knowledge you need to receive a passing grade.
Access 96 lectures & 8.5 hours of content 24/7
Learn how to output to the console & to the browser window by manipulating the DOM
Understand how to use variables, perform arithmetic, use operators, numbers, & Booleans, & much more w/ JavaScript
Code for JavaScript events & callback functions
Create arrays, strings, string functions, & more
Process text w/ JavaScript regular expressions
Access web services w/ the xmlHTTPRequest() Object
Discover JSON notation & parsing JSON content
Few programming languages provide you with the flexibility and pure power of Python, which is why many professionals recommend that beginner programmers learn Python first. Due to its relatively simply syntax and extensive degree of general-purpose use, it just makes sense to know. Python is commonly used for server side programming for complex web apps or as a middle tier language providing web services or a communication layer with larger ecommerce systems. All that is to say you can do a lot with Python, and this course will show you just how much.
Access 76 lectures & 5.5 hours of content 24/7
Explore some of Python’s many libraries for everything from games & graphics to complex mathematics
Study & modify code on your own to cement each topic
Familiarize yourself w/ Python syntax & real problem solving w/ Python
Complete a comprehensive project that integrates a number of different skills that are a part of core Python
Java is the most in-demand and highest paying programming language on earth, and regardless of your coding experience, you can become an expert with it in this course. From absolute basics to advanced concepts, this course takes you through descriptions of what Java can do, and teaches you how to make it work for you.
Access 62 lectures & 9 hours of content 24/7
Create a project, compile, & execute your first Java program
Learn useful shortcuts that will cut down on your programming time
Understand variables, operators, conditions, arrays, loops, & more
Take a deep dive into Object Oriented Programming
Discuss Lambda Expressions & generic types
HTML and CSS are two of the most essential programming languages for website design, allowing users to interact with site pages seamlessly and productively. In this example-driven course, you’ll learn how to create responsive websites that clients and users will love. Whether you’re aspiring to be a professional web designer or you just want to spruce up your blog, this course is an excellent introduction.
Access 57 lectures & 4.5 hours of content 24/7
Get an introduction to the basics of HTML5 & CSS3
Learn new multimedia updates in the newest versions of HTML & CSS
Work w/ HTML5 new forms elements & the canvas tag
Build a complete, professional looking webpage using HTML5 & CSS3 techniques
Start building Angular 2 apps within minutes of this comprehensive, 7 hour course. You’ll learn this exciting new framework with hands-on lessons, and by building actual, real-world applications. Approved by Google Developer Expert, Todd Motto, this is the one-stop shop to master Angular 2.
Access 156 lectures & 7 hours of content 24/7
Master the core Angular 2 concepts & how to use them in building real-world apps
Understand & resolve common Angular 2 errors
Build single page applications (SPA)
Learn ways to write cleaner, more maintainable code, & build reusable components
Use Reactive Extensions & Observables to handle asynchrony
Connect to backend services & APIs
You don’t need to learn both Java and Swift to build apps for Android and iOS. With Xamarin, you can use the C# programming language to build fully-functional apps for iOS and Android at the same time. Because Xamarin developers can stream the app-building process so much, companies are demanding them in a big way. This is the perfect beginner course to put you on the path to making big money in Xamarin development.
Access 48 lectures & 5.5 hours of content 24/7
Learn how to install Xamarin for free
Explore basic C# programming
Create basic apps w/ code sharing tasks, hints & tips
Build complex apps like a magnet detector & music player
You do a lot with your iPhone apps, but wouldn’t it be cool to build your own apps, as well? The best way to learn is by doing and this course will throw you into the fire, teaching you how to create your own iOS 10 apps in Xcode 8 and Objective-C, from concept to submission to the App Store. You’ll utilize brand new features as well as cross-platform standards as you iron down the basics of mobile app development and start working towards new career possibilities.
Access 104 lectures & 7.5 hours of content 24/7
Understand Xcode 8, iOS 10, Interface Builder, Simulator, & project types
Get a full guide to creating full featured apps in Objective-C
Create over 20 real iOS 10 apps in both Xcode 8 & Objective-C
Discover how to build for universal device & screen size support
Earn ad revenue & incorporate in-app purchases to get paid on your apps
Learn Core Data & camera support applications
SQL is the most popular database programming language in the world today, and has been for many years. In this course, you’ll learn the fundamentals of writing SQL to perform a variety of data manipulations. Considering it’s used by many, many Fortune 500 companies and startups of all sizes across the globe, learning SQL is a major boost to your resume.
Access 35 lectures & 4 hours of content 24/7
Get a firm grasp of SQL programming fundamentals
Learn about ASP.NET, IIS, & Visual Studio
Create & change tables using SQL
Make SQL Server work w/ ASP.NET
Join tables seamlessly
When it comes to web programming, there are a lot of tools you can learn and use to make your workflow more efficient and your products more exciting. Getting started can be daunting when you know just how much there is to learn. However, the barriers to learning are lower than ever, and this immersive course will give you a crash course into a variety of languages and tools, plus how to integrate them, giving you an excellent foundation for further learning.
Access 67 lectures & 10.5 hours of content 24/7
Add dynamic features to a website using JavaScript & jQuery
Transfer information between web pages using JSON
Layout websites more efficiently w/ CSS & HTML
Power the back-end of a website w/ C#
Work w/ data more efficiently using SQL Lite
from Active Sales – SharewareOnSale https://ift.tt/2q0Kp8o https://ift.tt/eA8V8J via Blogger https://ift.tt/2sosVWo #blogger #bloggingtips #bloggerlife #bloggersgetsocial #ontheblog #writersofinstagram #writingprompt #instapoetry #writerscommunity #writersofig #writersblock #writerlife #writtenword #instawriters #spilledink #wordgasm #creativewriting #poetsofinstagram #blackoutpoetry #poetsofig
0 notes
Text
December 07, 2019 at 10:00PM - The Immersive Angular 2 Bundle (88% discount) Ashraf
The Immersive Angular 2 Bundle (88% discount) Hurry Offer Only Last For HoursSometime. Don't ever forget to share this post on Your Social media to be the first to tell your firends. This is not a fake stuff its real.
Learning Angular 2, the new version of the JavaScript framework created by Google, is easy with this immersive 9 hour course. You’ll cover all of the fundamentals of Angular 2 and gain the skills to separate yourself from other web developers. The best part? This course is still adding content that you’ll have access to down the line.
Access 71 lectures & 9 hours of content 24/7
Understand the basic Angular 2 concepts, like Components, Templates, Services, Dependency Injection & more
Choose the best language for you, between JavaScript, new JavaScript, or TypeScript
Make HTTP requests & integrate w/ backend
Set up a production-ready build workflow using NPM & Webpack
Write unit tests w/ Jasmine & run them w/ Karma
Navigate w/ the Angular Router
Angular 2 is the latest version of the powerful JavaScript library, AngularJS, and has been praised for the speed, cross-platform capability, flexibility, and expressiveness it has augmented from the original framework. The new features of Angular 2 put a greater emphasis on mobile development, browser compatibility, and dynamic loading. Throughout this course, you’ll use Angular 2 to build 10 apps, gaining a better grasp of this new technology as you go.
Access 81 lectures & 14 hours of content 24/7
Explore related technologies like NodeJS, Firebase, MongoDB & the Ionic Framework
Build a simple Angular website to get acquainted w/ the Angular 2 framework
Learn how to build an application that allows you to search Github profiles using the Github API
Incorporate the Spotify API & create an album/artist application
Design a functional Todos App using the MongoDB, Express, Angular & NodeJS
Create a business listing or business contacts app using Firebase
Build fitness, weather, movie & maps apps
If you want to gain a competitive edge in UI/UX design, web development, or mobile apps, then it’s important to know Angular 2, the newest version of the popular AngularJS framework. Regardless of experience, this course will get you up to date with all the basic AngularJS features, and all the new ones contained in Angular 2. You’ll start with an introduction to TypeScript, the Cloud 9 IDE, and using Angular 2 modules, before progressing to building your own Angular 2 projects.
Access 71 lectures & 5 hours of content 24/7
Understand Angular 2 & how it can help you as a developer
Code an Angular 2 project w/ an online IDE
Get to grips w/ Angular 2’s many powerful features
Improve your UI/UX design & development skills
Discover what’s new in the latest version of Angular
Start building Angular 2 apps within minutes of this comprehensive, 7 hour course. You’ll learn this exciting new framework with hands-on lessons, and by building actual, real-world applications. Approved by Google Developer Expert, Todd Motto, this is the one-stop shop to master Angular 2.
Access 156 lectures & 7 hours of content 24/7
Master the core Angular 2 concepts & how to use them in building real-world apps
Understand & resolve common Angular 2 errors
Build single page applications (SPA)
Learn ways to write cleaner, more maintainable code, & build reusable components
Use Reactive Extensions & Observables to handle asynchrony
Connect to backend services & APIs
AngularJS is a structural framework that extends HTML to create more complex, dynamic web apps. The new version, Angular 2, offers the same benefits of the original, but is better aligned with Google’s focus on mobile development, and uses an easier dialect of JavaScript, Typescript. This Angular 2 course has been created by industry specialists to equip you with the skills to work with both Angular and Angular 2 fundamentals, and learn the best tricks to build better websites.
Access 41 lectures & 6 hours of content 24/7
Learn fundamentals to using Angular & Angular 2
Work w/ components & data binding
Understand templates, events & services
Discover pipes, form controls, observables & more
Optimize a Customer Manager Application
Use included quizzes to assess your learning at the end of each section
Angular 2 is allowing developers to architect larger scale and more maintainable software, and is emerging as a hot-button topic for developers to learn. This course will take you through the basics of Angular 2 to get you up to speed with this powerful new framework so you’ll be ahead of the curve as it continues to develop.
Access 49 lectures & 2.5 hours of content 24/7
Create Angular components to describe your application features
Compose Angular components & delegate functionalities to interested parties
Use Angular Component Controllers to encapsulate instance variables & make them available to templates
Make Service Classes to handle business logic of your application
Get a handle of DOM elements using local variables in templates
Debug issues using the debugger in Chrome DevTools
from Active Sales – SharewareOnSale https://ift.tt/33uc3uu https://ift.tt/eA8V8J via Blogger https://ift.tt/2DYJV8g #blogger #bloggingtips #bloggerlife #bloggersgetsocial #ontheblog #writersofinstagram #writingprompt #instapoetry #writerscommunity #writersofig #writersblock #writerlife #writtenword #instawriters #spilledink #wordgasm #creativewriting #poetsofinstagram #blackoutpoetry #poetsofig
0 notes